Preface
We use the art software Clip Studio Paint (CSP) for all of our maps – therefore this guide is made in and for CSP.
This guide is also written by a PC user, and will therefore reference the keys and shortcuts on a PC. If you are using a Mac you will have to know the equivalent keys.
I’m also using a graphics tablet, which helps for pressure sensitive brushes and is especially useful for shading. It is not required for mapmaking in CSP, but is very helpful.
This guide is NOT the “Only Way”, the “Right Way” or most likely not even the most optimal way to do things, it’s simply to show what my (Stryxin) workflow looks like.
- If you prefer some other way of doing things that achieves the same thing? Cool, do that. Whatever works for you!
- If I’m doing something horribly inefficient and you have a tip how I can improve my workflow, please let me know!
- If you strongly disagree with something in this guide and want to tell me how my way is stupid or wrong or otherwise express your feelings about it, please feel free to email me at [email protected]
Resources
Software: Clip Studio Paint
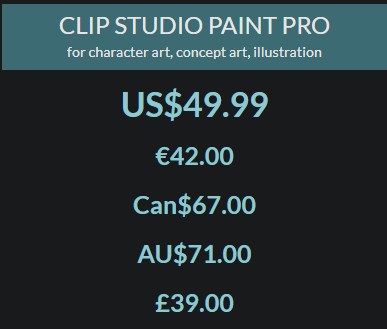
We use the art software Clip Studio Paint PRO version which is available as one time purchase for $49.99 (Occasionally on sale for $24.99).
There is also a 30 day Free trial (requires registration) if you wanna test it out first!
Resources:
FA CSP Brushes & Auto Auctions set
FA Mapmaking Pack

Initial Setup
After you’ve installed the software and launched it, there are a couple of things we need to take care of first that should be beneficial in the long run 🙂
Adjusting Preferences
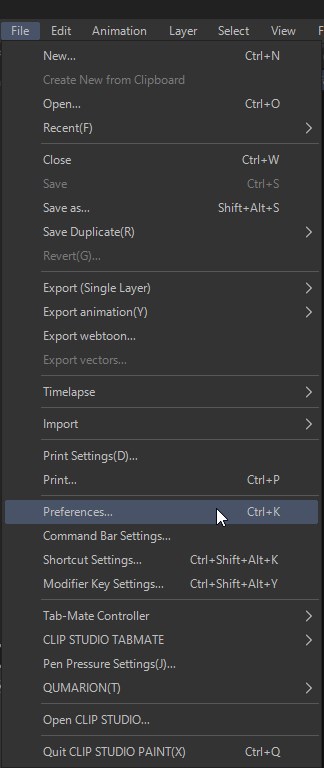
Go to File > Preferences
In the “Ruler/Unit” tab, set your preferred Color of Grid and Dividing lines, you can also change the opacity.
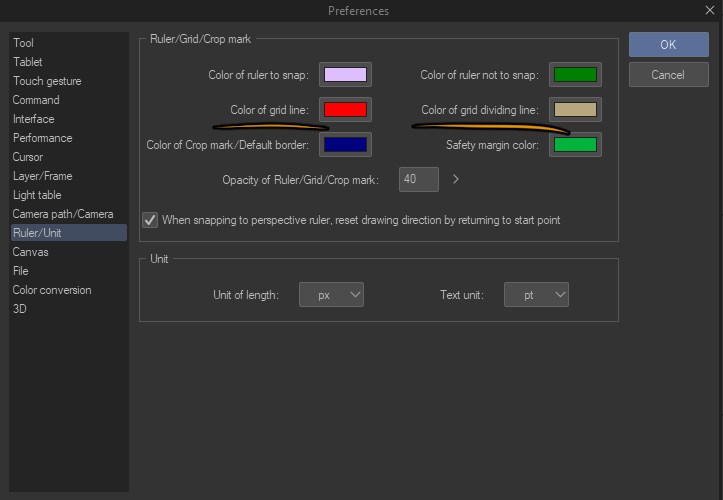
I have it set to red for main grid lines and “off-white” for dividing lines at 40 Opacity.
Which looks like this: 
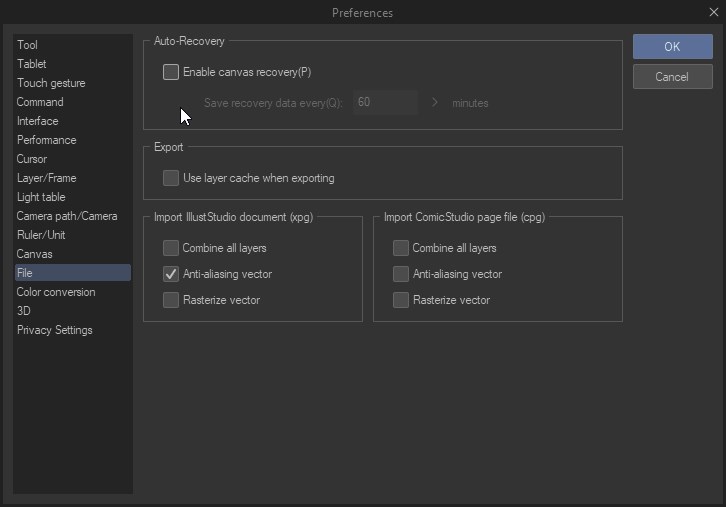
In the “File” tab, Uncheck “Enable canvas recovery” – This is basically a “Autosave” feature. We don’t want this to be enabled simply because it can pop up at random times when you are in the middle of a line, and saves without a “Resolution Fix Trick” take forever.
Since we are disabling the autosave feature, remember to save often manually! Things like crashes or power outages etc. can happen and you probably don’t want to lose hours of work if something like that occurs.
Importing Brushes & FA AutoAction Set
FA Autoaction Set
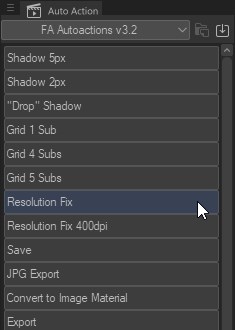
One of the files in our CSP Brush Bundle is the “FA Autoaction Set” which you can import (Drag & Drop) into your “Auto Action” Panel.
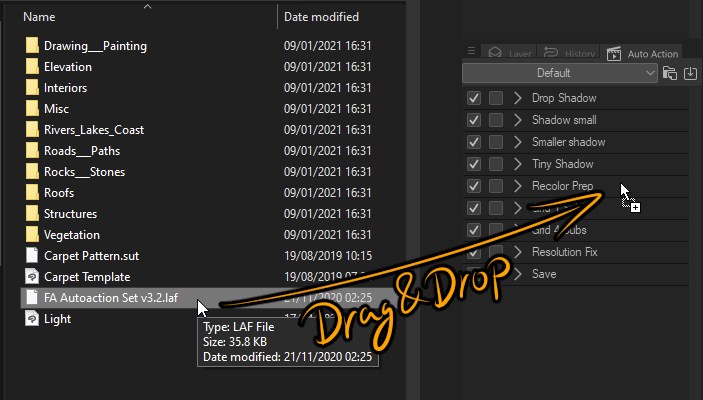
After importing the Autoactions, I recommend switching to “Button Mode”.
Importing Brushes
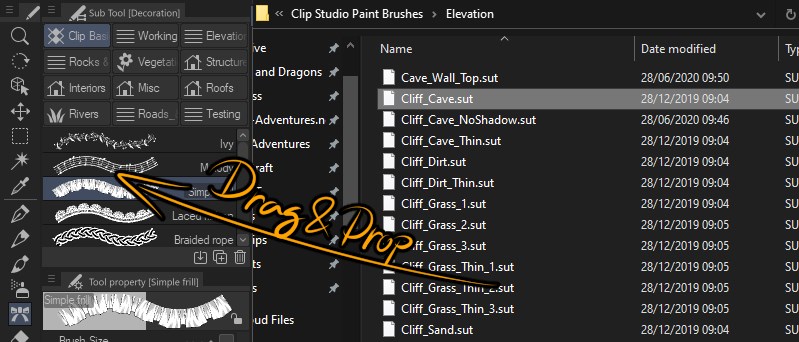
The “.sut” files are CSP brushes.
To import a brush, you can simply Drag & Drop it into the “Sub Tool” Panel. You can Drag & Drop multiple brushes at once, but keep in mind that some brushes are quite large and importing multiples of them can be quite intensive, so don’t do all of them at once.
I would suggest importing in batches so your PC can handle it.
Also read the next section first before you start importing 🙂
Categorizing and Organization of Brushes
The brushes are categorized into different folders so it’s a bit easier to find what you are looking for, in CSP you can create as many “Tools” and “Subtool Categories” as you want, so how you want to categorize & organize the brushes is up to you.
For example, I’ve placed all of the “mapmaking” brushes into the “Decoration Tool” and created multiple Subtool Categories based on the folders in the brush bundle pack.
To create these subcategories & move brushes around, you can simply Drag & Drop any already imported brush into the upper section of the Sub Tool Pane.
You can only move one brush/tool at a time this way, so I would suggest making the subcategories first, and then bulk-importing the brushes directly into those subcategories.
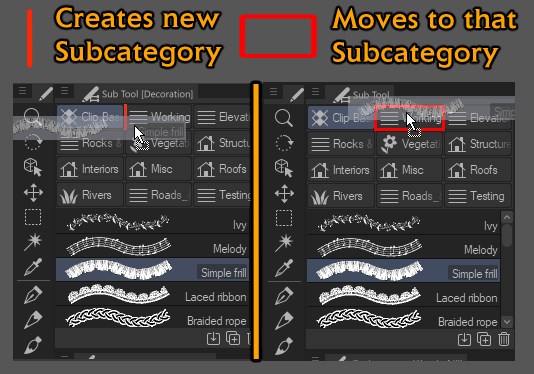
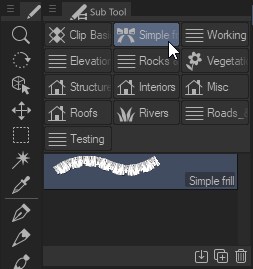
Newly created Subcategory can be renamed by Right Clicking.
The icon of this Subcategory is the same as the Icon of the First brush/tool in that Subcategory.
Preparing the Workspace & Keyboard Shortcuts
My Workspace
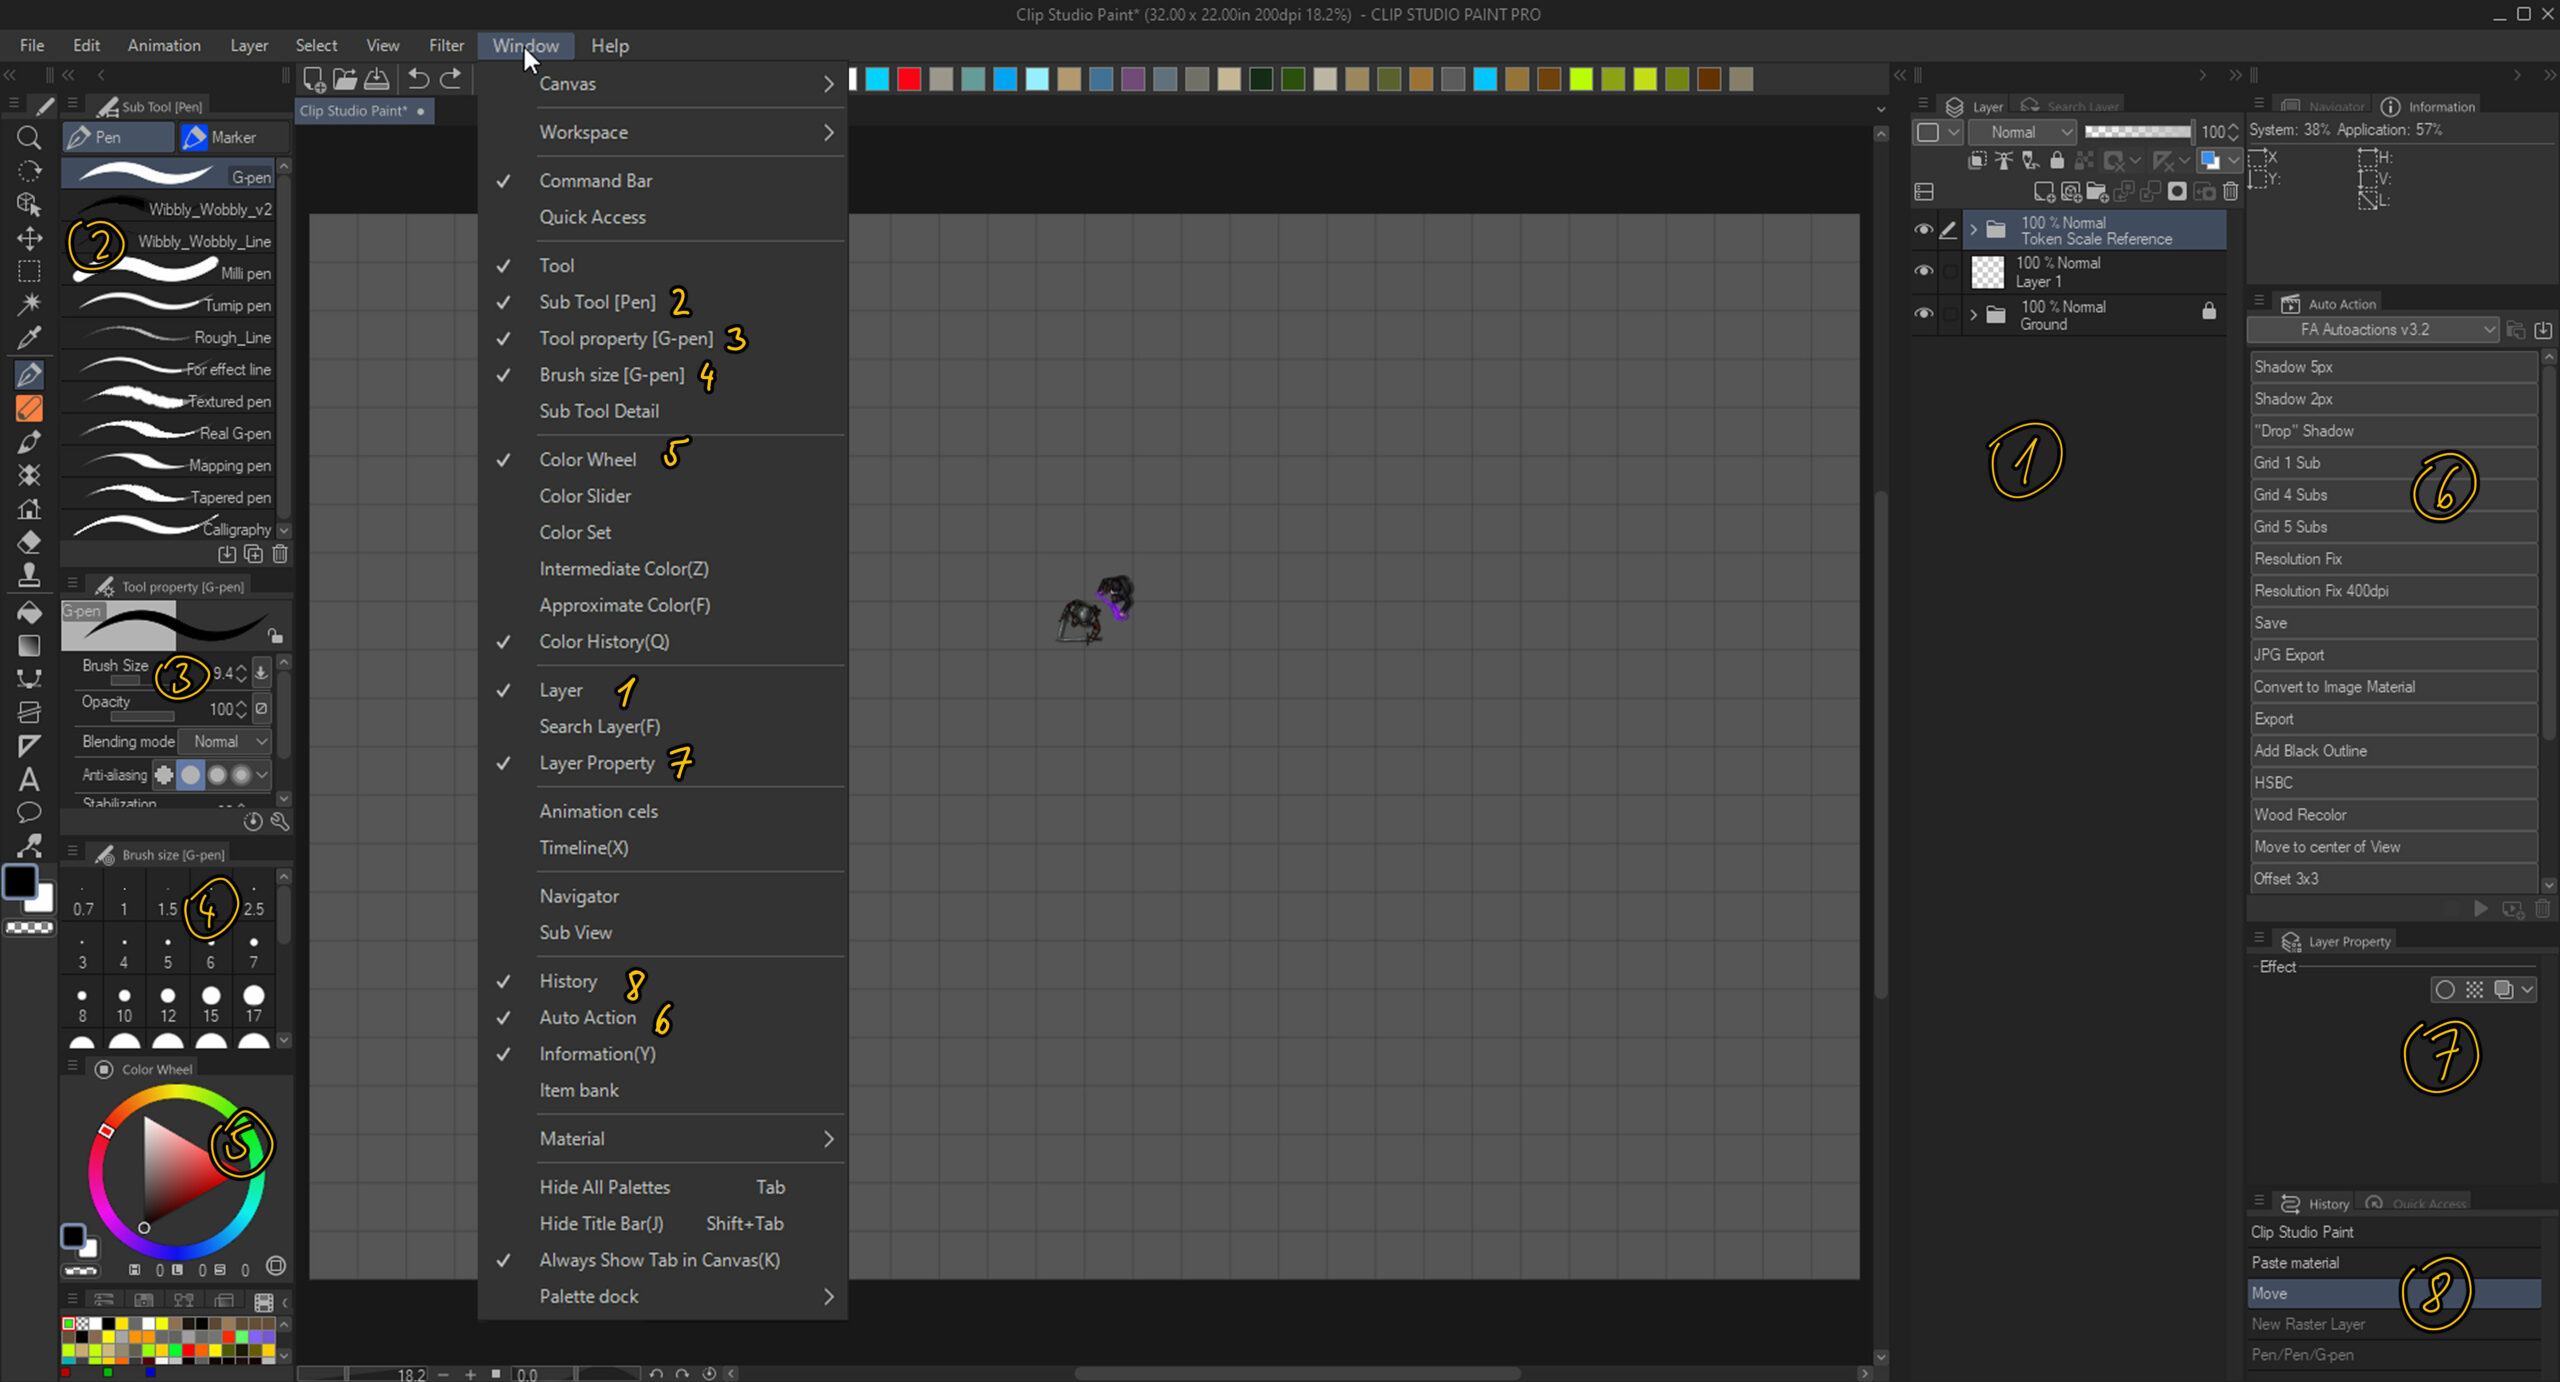
You can move stuff around however you like of course. The layout is totally up to your preference. I would just suggest having all the important/frequently used panels available:
-
- Layers
- Sub tool
- Tool Property
- Brush Size
- Color Wheel
- Auto Action
- Layer Property
- History
Getting used to the workspace will take a little bit of time, but it should help with efficiency knowing how to access each tool and panel that you might need.
My Keyboard Shortcuts & Keybinds:
Keyboard shortcuts are not necessary, but they can speed up the workflow immensely. I highly recommend utilizing them 🙂 You can obviously keybind all the shortcuts to your preference, but these are (mostly) all the ones that I use frequently.
I’ll also be referring to these keybinds/shortcuts in the guide.
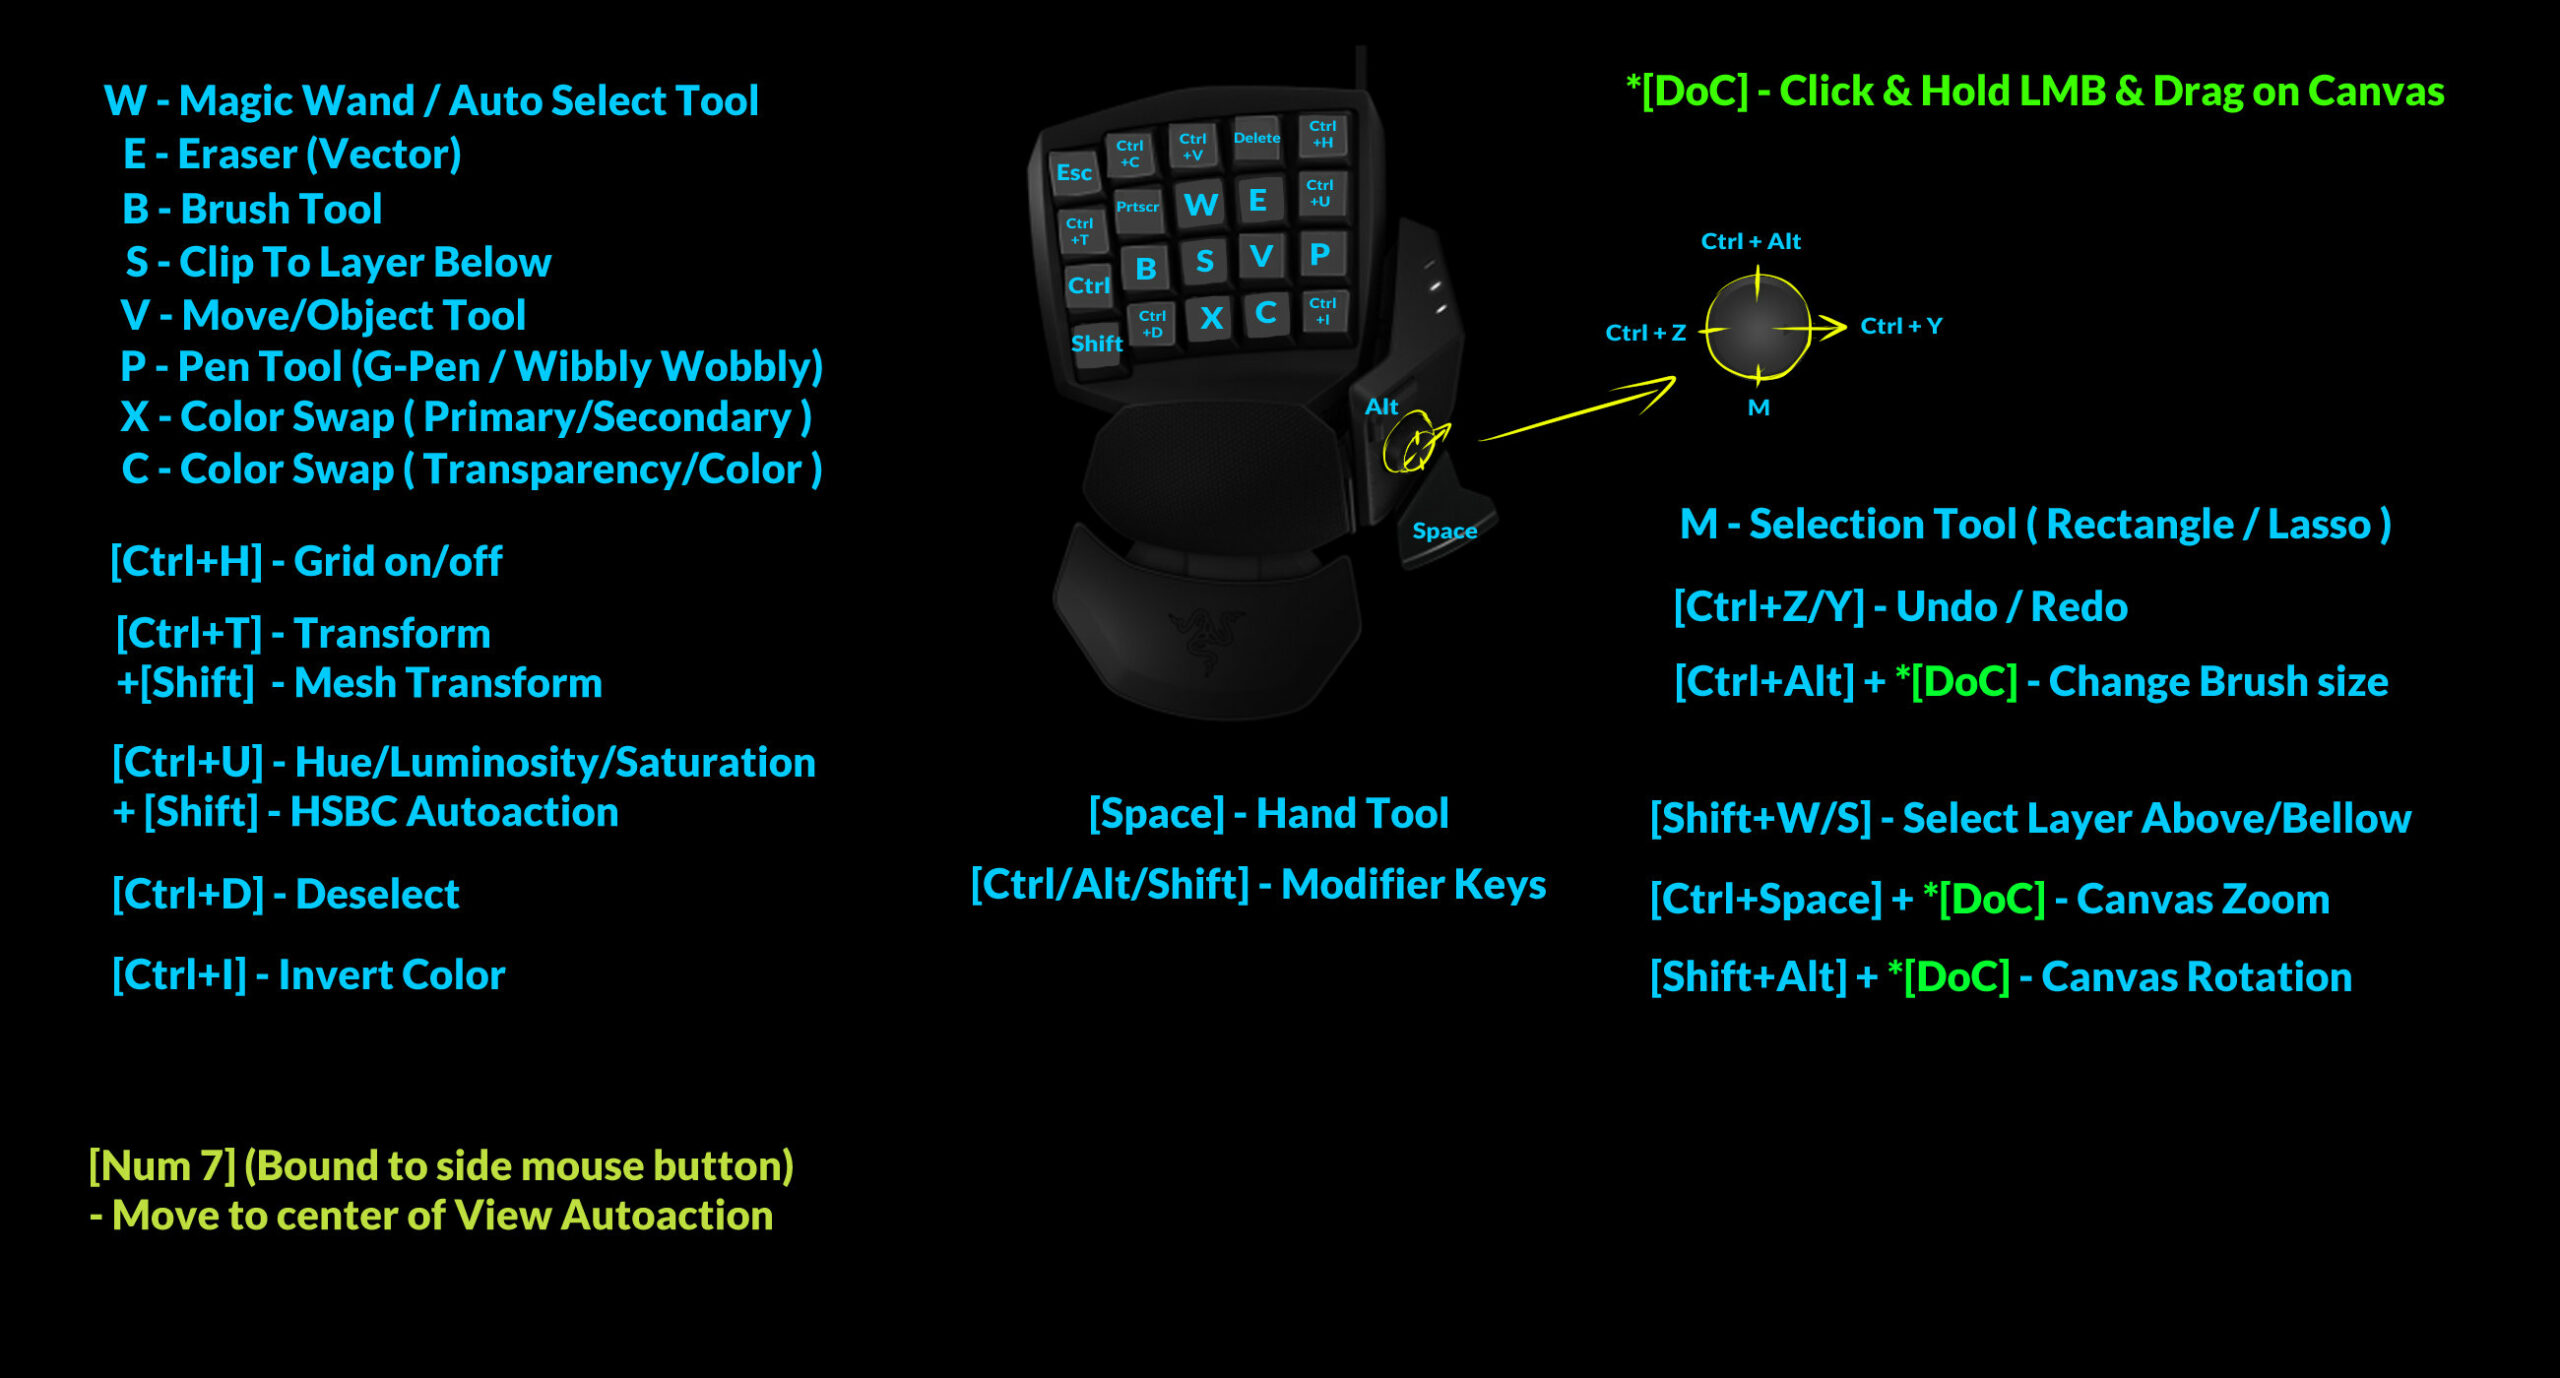
In certain tools the Modifier Keys (Ctrl/Alt/Shift) are used to modify how the tool behaves, for example when using the Selection Tool the default behavior is to create new selection each time, but by holding down Shift or Alt, you can “Add” or “Subtract” – respectively, from your current selection.
“Template” File – Setting up Canvas Resolution and Grid correctly
Instead of creating a new canvas each time, I’ve just made a “Template” file that has correct resolution and grid settings. Open this file, save it under a new name so you don’t ruin the template 😀 and you are good to go 🙂
I also just open CSP through this file instead of the actual CSP icon.
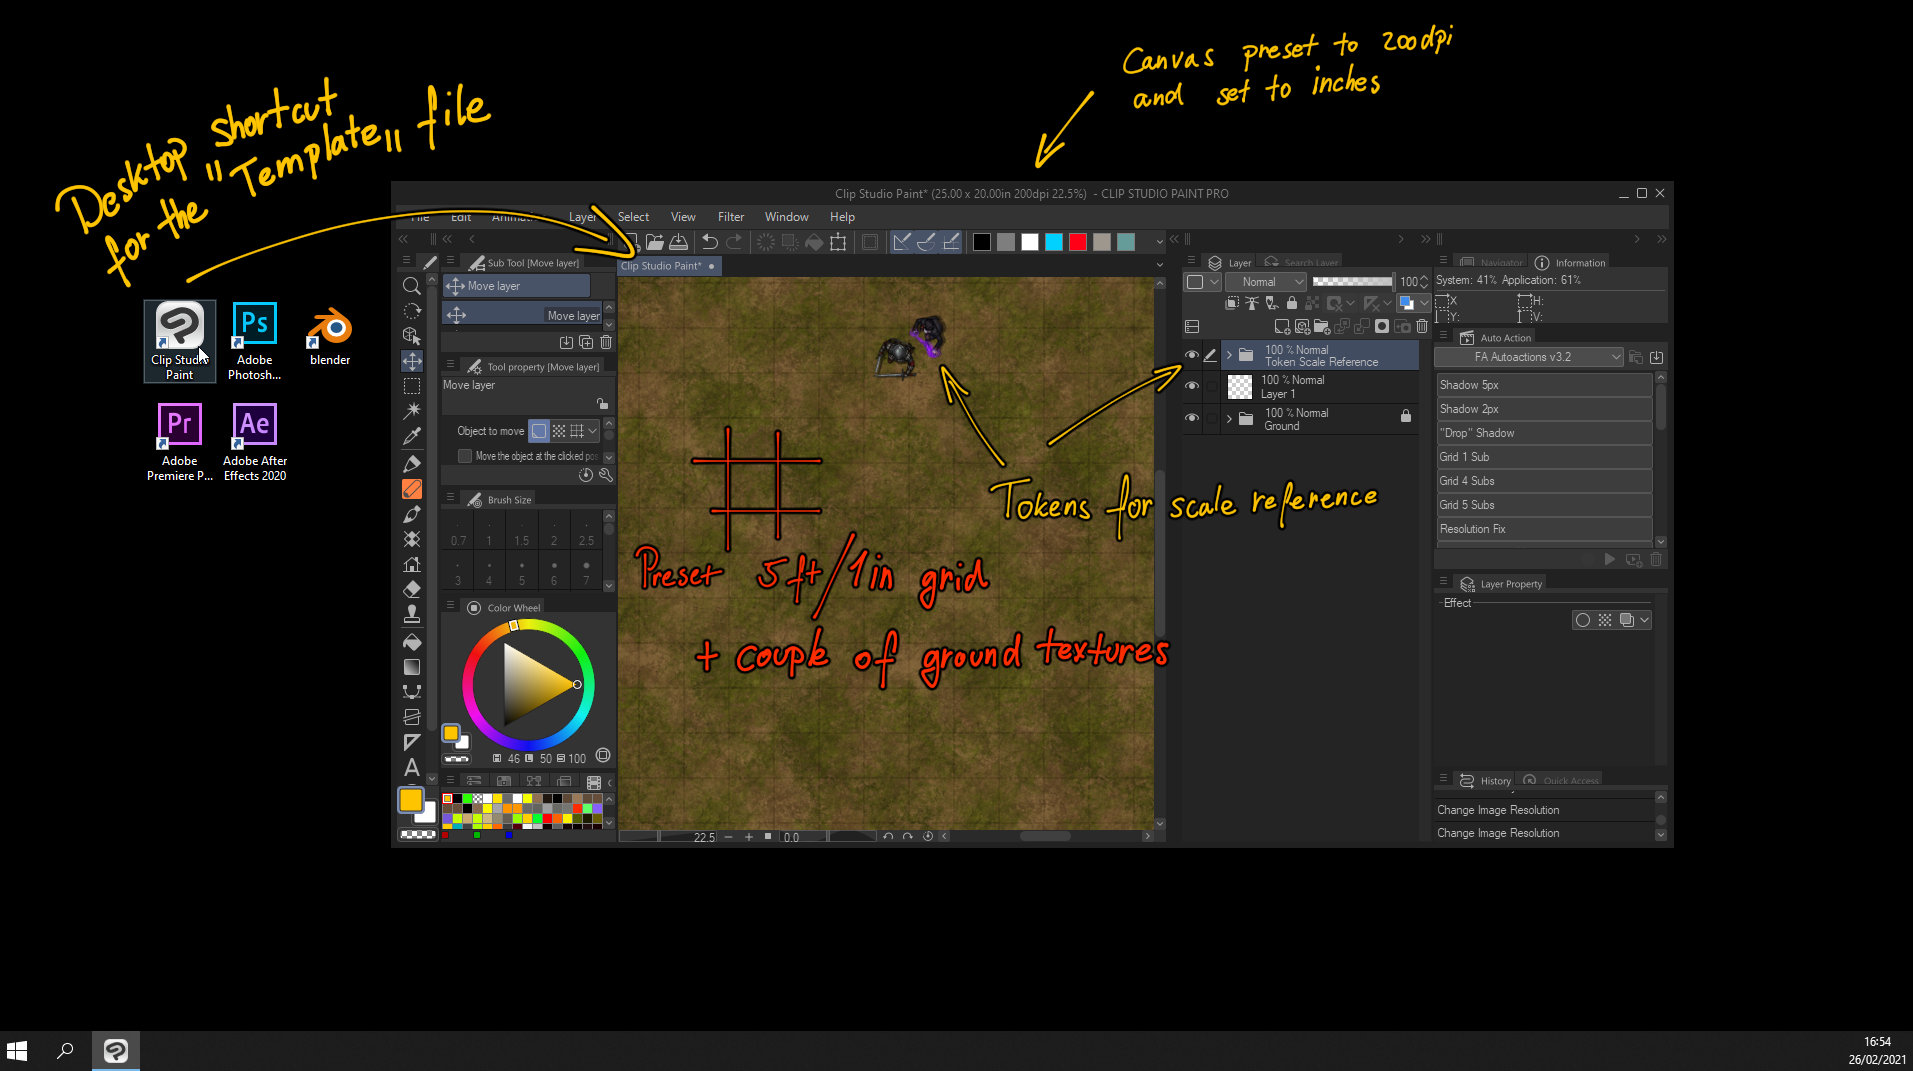
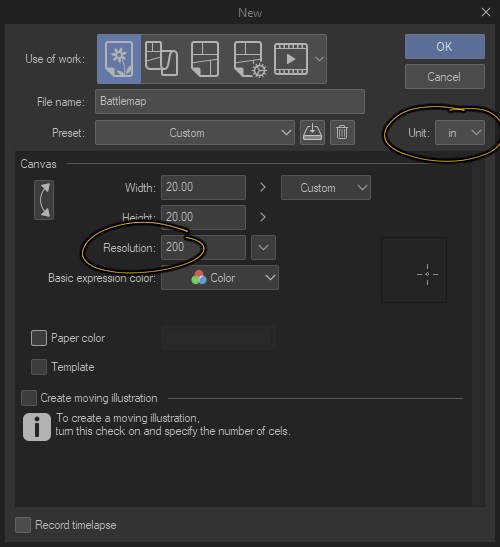
The Template file has correct Resolution for our assets (200dpi) and the Canvas is set to Inches. Size is 25×20 inches, but you can easily change the canvas size based on your needs by going to Edit>Change Canvas Size.
It also has a “Ground” folder which has a pre-set Grid and some basic ground textures thrown in. Also a couple of Tokens for Scale reference, which is always handy to have 🙂
To save you a headache, you can just download my Template File here.
If you prefer to set up your canvas yourself, just make sure you have the resolution at 200 and units on “in” (Inches). This should ensure that the grid scale matches our asset scale.
Grid is a great reference for scale, but tools and brushes can also snap to grid when it’s active.
Unfortunately, there is no object/asset snapping in CSP.
With the Canvas set to “In” , each grid square represents 1×1 inch or 5×5 feet in D&D terms. You can activate the grid and adjust grid settings in View>Grid and View>Grid/ruler Settings respectively.
Or use the shortcut (Ctrl + H) and use the Auto Auctions for quick adjustments.
You can disable Snap to grid (and also rulers) on the top panel. In case you want to have the grid active for reference but not snap your tools to it. Snapping to the grid affects most tools by default.
Getting Started Section
“Resolution Fix” save trick
CSP is caching all the zoom levels so it’s smoother to zoom in and pan around the canvas, however this bloats the file size when you save your project, since this cache is getting saved as well.
Before saving your project, you can use this trick to “flush” the cache and reduce the file saving time.
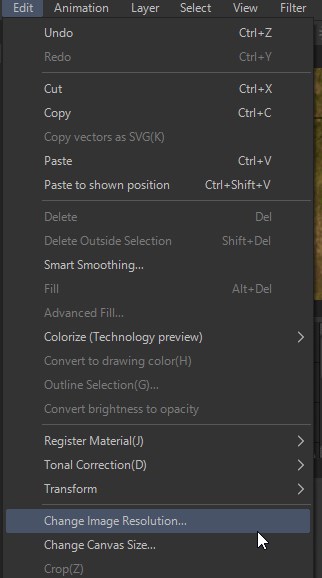
Just go to Edit > Change Image Resolution OR Change Canvas Size > Don’t change anything and just click OK
This process “Resets” the canvas and flushes the zoom cache.
Alternatively you can just use the Autoaction “Resolution Fix” from our Autoaction Set, which does the same thing, but with one click.
Just get in a habit of clicking that every time before you save your file 🙂
Navigating the canvas ( zoom, pan, rotate )
Now that we have our canvas ready, here is how you can easily navigate it.
Pan
Hold down [Space] + Click & Hold down [Left Mouse Button] and drag on canvas.
Zoom
Hold down [Space] + [Shift or Ctrl] + Click & Hold down [Left Mouse Button] and drag on canvas – Left to Zoom out, Right to Zoom in.
Hold down [Space] + [Shift or Ctrl] + [LMB Click] – “Snap” to certain zoom levels.
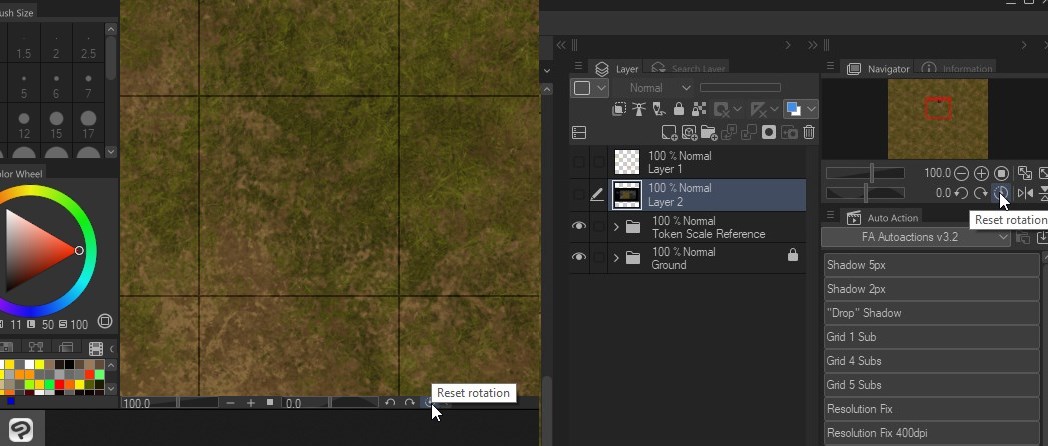
Rotate
Hold down [Shift] + [Alt] + Click & Hold down [Left Mouse Button] and drag on canvas.
To reset the rotation you can use the Reset Rotation button.
Color Swatches and “Transparent” Color
We have 3 Colors in CSP – Main Color, Sub Color and “Transparent” Color
Main and Sub colors are pretty standard in most graphic software.
You can easily change your Main and Sub colors by either using the Color Wheel, or if you need a precise color based on HEX or RGB values etc., double clicking on the “color box”.
There isn’t much difference in functionality between the Main and Sub colors, except for multicolor brushes. Otherwise they function the same and you can switch between them freely using the “X” keyboard shortcut.
Any color can be saved to the quick color palette on top of the screen by simply right click > add drawing color.
“Transparent” Color is probably unique to CSP, or at least much less common in other software.
Selecting the transparent color  basically turns any brush into an eraser.
You can switch between the last selected color (Main or Sub) and Transparent color with “C”. Extremely speeds up the workflow for shading for example. Since you can both paint and erase with the same tool.
Placing Assets & Textures
Importing Assets & Textures into CSP as Layers
You can import any PNG (Assets) or JPG ( Textures ) files into CSP by simply Drag & Drop from your file explorer into the Layers Panel.
Importing Assets:
Assets imported this way will always appear in the center of the canvas.
You can use the “Move to center of View” Autoaction (you can keybind it) to move your imported assets to your current view position.
Importing Textures – Turn on Tiling in the Tool Property [Object] panel after importing, so they fill out the whole canvas.
You can also make a selection first and then import your texture, which will fill your selection (after turning on tiling) – This utilizes Layer Masking which is explained in a section below.
“Object” Manipulation – Scale/Move & Rotate Image Materials
Imported Assets and Textures appear as “Image Materials”, which you can Manipulate with the “Object” Tool. Precise and fine adjustments can be done in the Tool Property panel.
Holding Shift while rotating will snap to 45° angles. You can also adjust the Interpolation Method to “Clear Edges (bicubic)” (Setting is hidden by default) , which should give you more sharpness on some objects at certain angles.
Unfortunately I’ve not found a way to make Clear Edges interpolation to be set as default or how to make it into an autoaction :/ So it has to be changed manually for each object.
Transform – Manipulation of Non-Image Material Layers and multiple layers at once.
To Rotate/Resize the Non-Image Layers or to Rotate/Resize multiple layers/objects at once, you can use the “Transform” Tool (Ctrl +T).
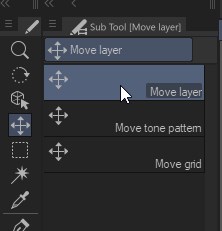
You can Move multiple layers without using Transform – with the “Move Layer” Tool (V).
Layers
Layer Panel Explained
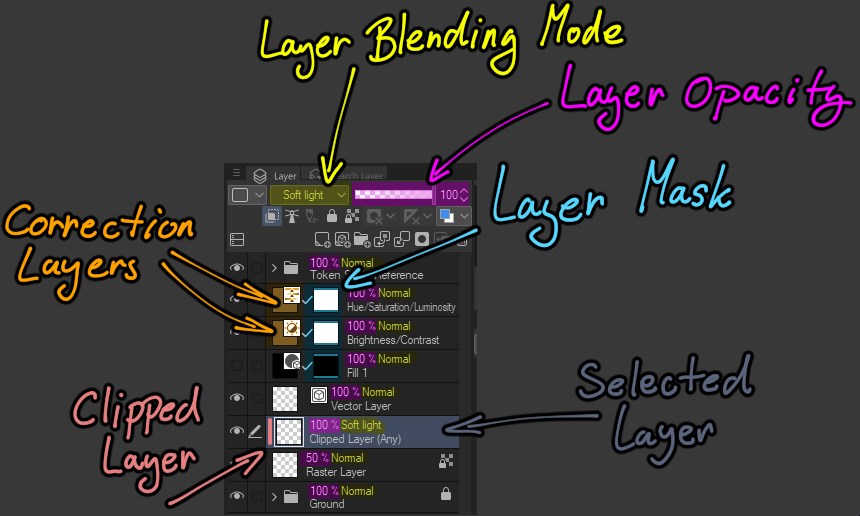
Blending Mode – Sets how the layer blends with layers below
Opacity – Overall opacity of the layer, or how “transparent” the layer is.
Both of these are displayed above each layer name.
Correction Layers, Layer Masking and Clipped Layers are explained in the later sections.
Layer Types
Image Material  Layers
– Imported PNG and JPEG files.
– Can be “Transformed” without loss of quality as they are essentially linked to original files.
– That also means they can’t be edited directly apart from basic transformation – scale & rotation. Meaning you can’t draw a new line or a bit of shading with a brush directly on an Image Material Layer for example.
Rescale Example – Raster/Standard vs Image Material
Vector  Layers
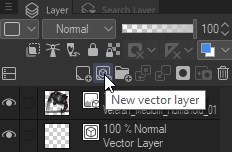
– Anything drawn on a vector layer is in a form of a “mathematical equation” – Line or a curve, with your chosen “brush tip” attached.
– This means that it can be adjusted and changed after it’s been drawn. You can also have multiple independent “Lines” on the same layer that can be edited separately.
This is one of the main advantages of CSP for mapmaking.
A more detailed “Utilizing Vectors” section is below, but here are some examples of how Vector Layers can be used for mapmaking:
Raster Layer
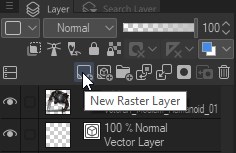
The “standard” layer type used for pretty much everything that the more specialized layers above can’t do – shading, anything that requires color mixing, blocking in basic shapes, etc.
For example, you can’t “Fill” a selection on a Vector layer, or blend 2 colors together, because Vectors are made out of mathematical lines with some “Brush tips” attached. Each line is registered separately – even if they are on the same layer.
Raster layers work with pixels so you can fill, mix, or edit however you like.
Fill Layers
Pretty self explanatory: fills the whole canvas with a chosen color. These are mostly useful in conjunction with layer masking, clipping and Blending Modes (explained in the sections below.)
To add new Fill Layer, Right Click on the Layer Panel > New Layer > Fill…

Correction Layers
To add new Correction Layer, Right Click on the Layer Panel > New Correction Layer
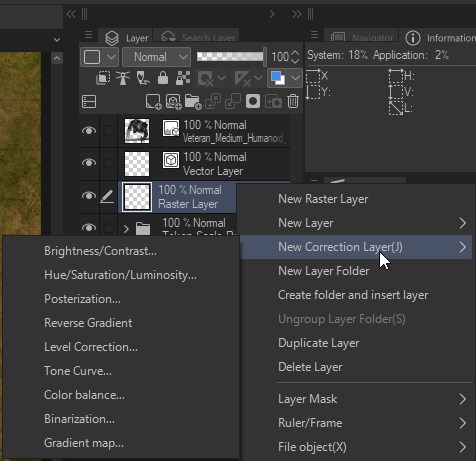
Correction layers are a non-destructive way of making adjustments like brightness, contrast, hue or saturation to your layers or to the whole canvas.
Even though all correction layers can be useful in certain situations, we are mostly going to be using these four options:
– Brightness / Contrast
– Hue / Saturation / Luminosity
– Tone Curve
– Color Balance
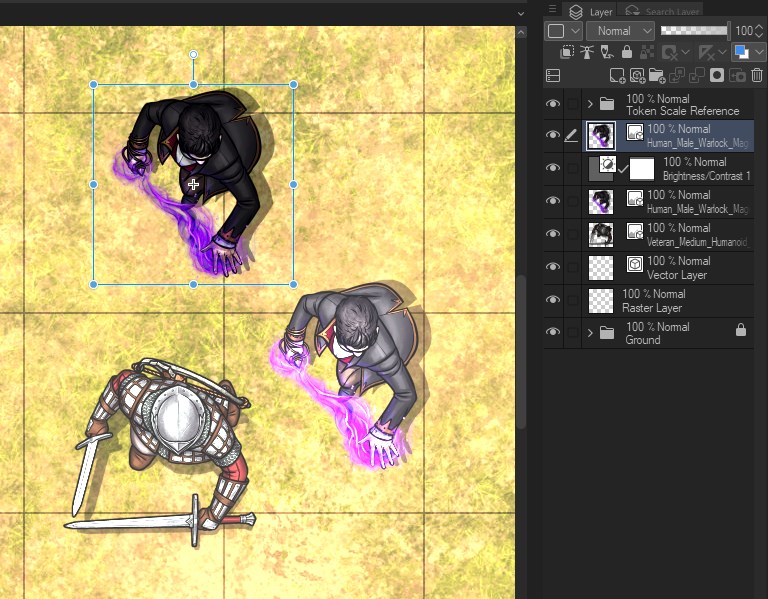
Correction and also Fill layers affect all layers that are below them in the layer order by default, unless you combine them with layer clipping and/or layer masking (explained in a section below.)
Blending Modes and Opacity
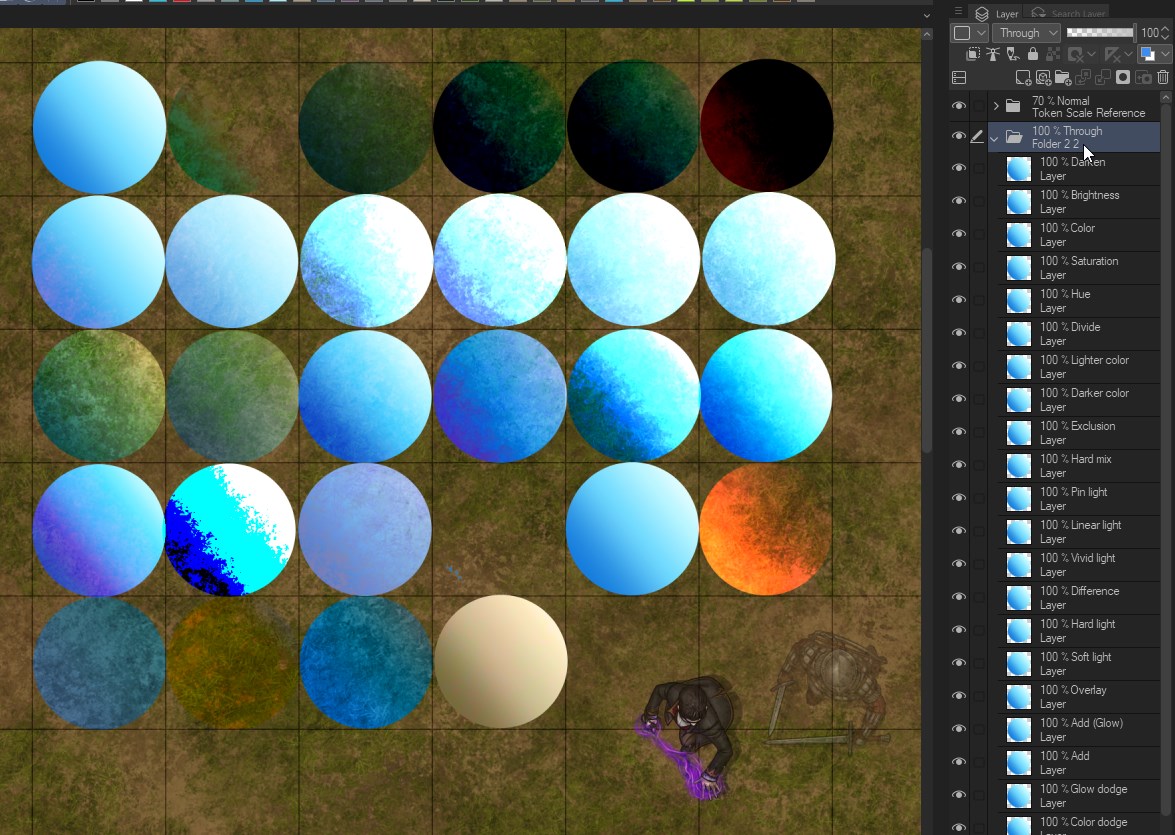
A Blending Mode is an effect you can add to a layer to change how the colors blend/interact with colors on lower layers.
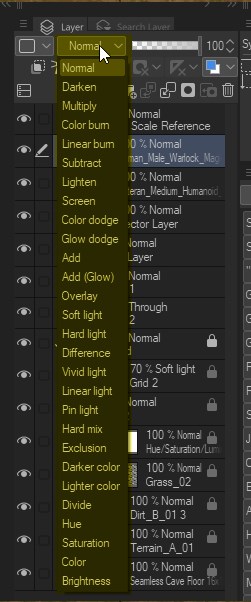
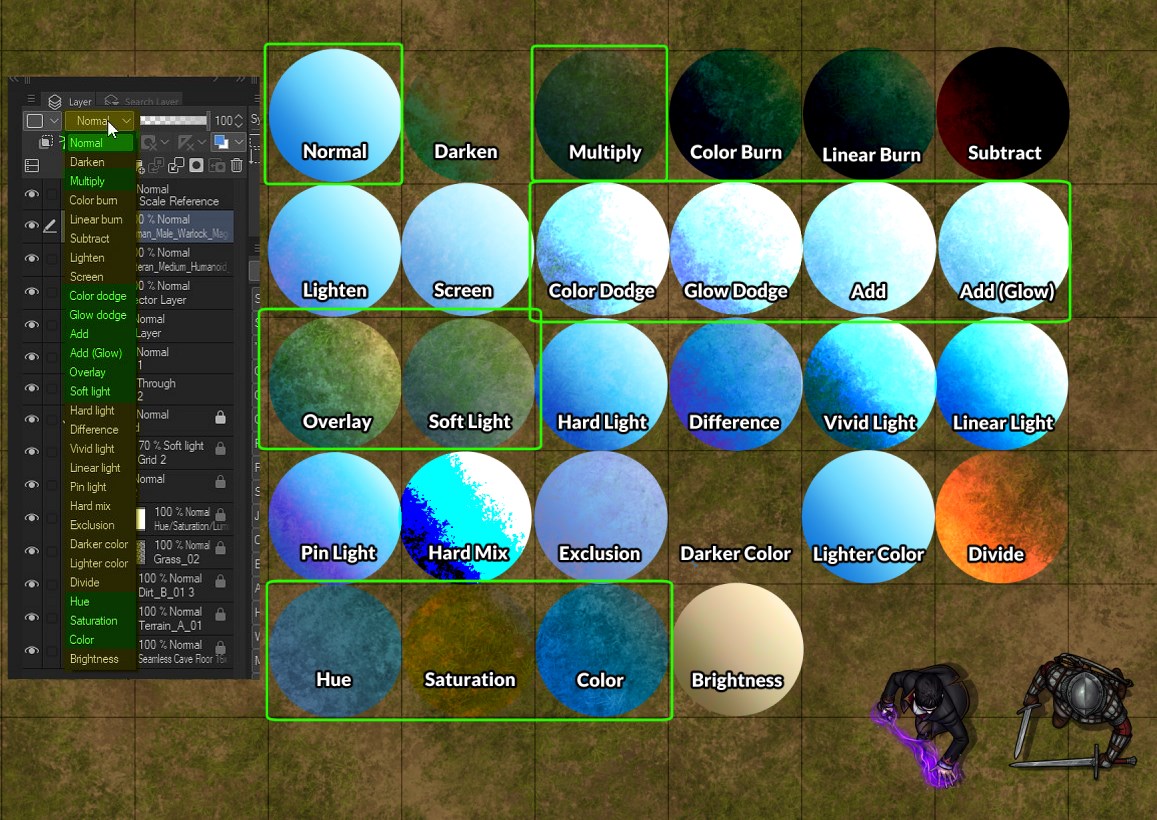
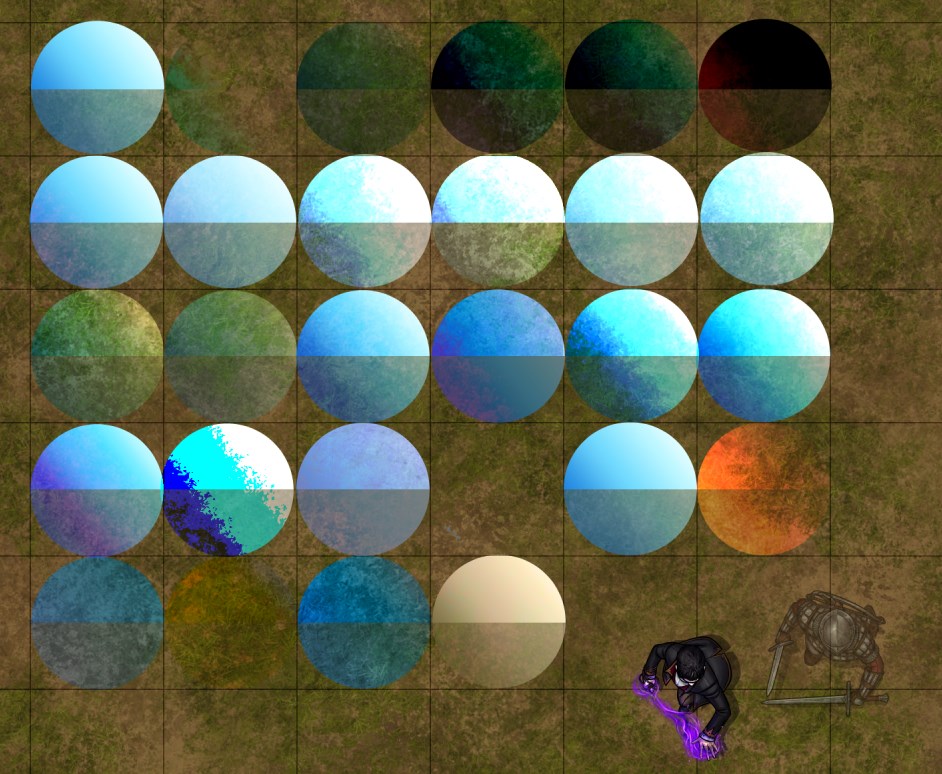
They all behave in different ways – as you can see in this example, which shows the exact same gradient circle in all Blending Modes.
You can use these modes to your advantage in various ways once you get an idea which does what – a lot of experimenting and playing around is usually required 😀
The overall behavior, color mixing, and blending is based on the base colors, saturation, luminosity, and probably some other factors of the layer itself and also the layers below.
Each Blending Mode has a certain equation which dictates how it interacts with other layers. I don’t think getting into the gritty details of these equations is worth it in this guide. To be honest I have no idea how they are calculated myself – But I have a pretty good understanding of how they work through experimenting and I believe you can get a hang of it pretty quickly yourself too.
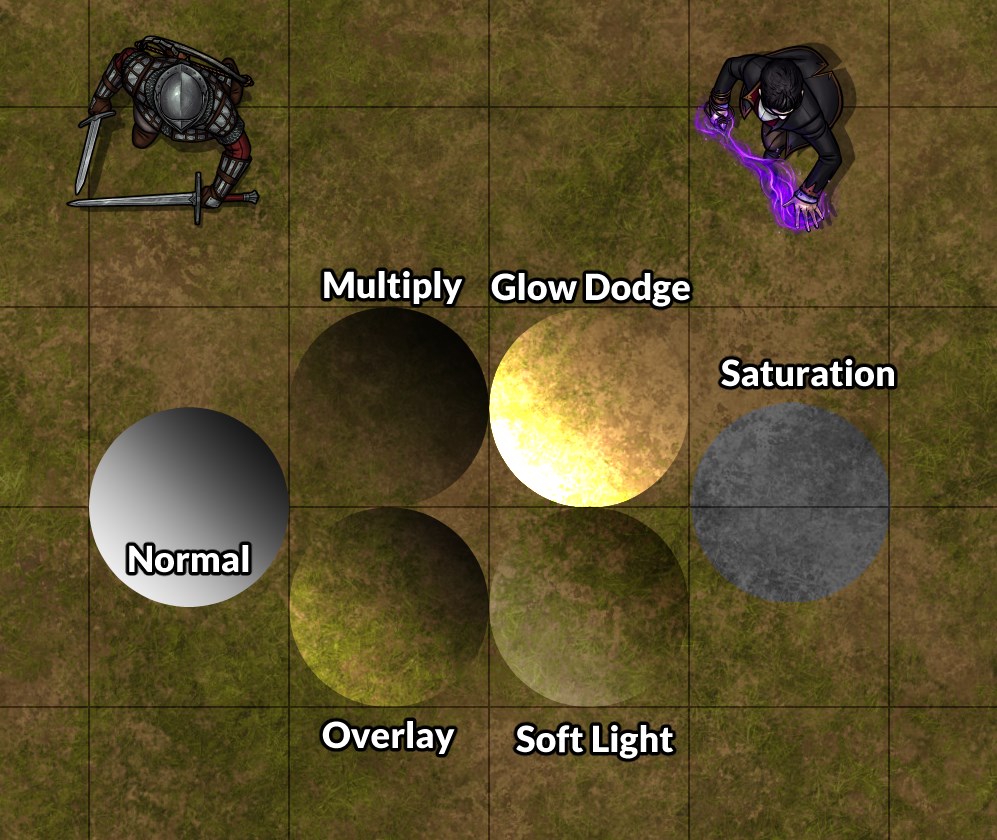
Same as with Correction Layers, there are plenty of options here, but apart from “Normal,” which is the default mode, we will only use the modes highlighted with green boxes on a regular basis.
We mostly only use Black, White, and Gray colors in combination with some Blending Modes, especially for Shading and Lighting – which again, might behave slightly differently than other colors.
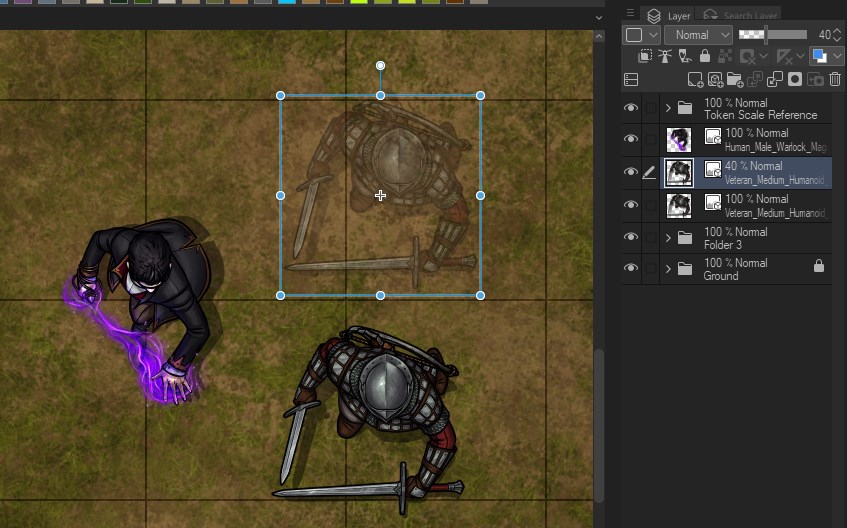
Layer Opacity
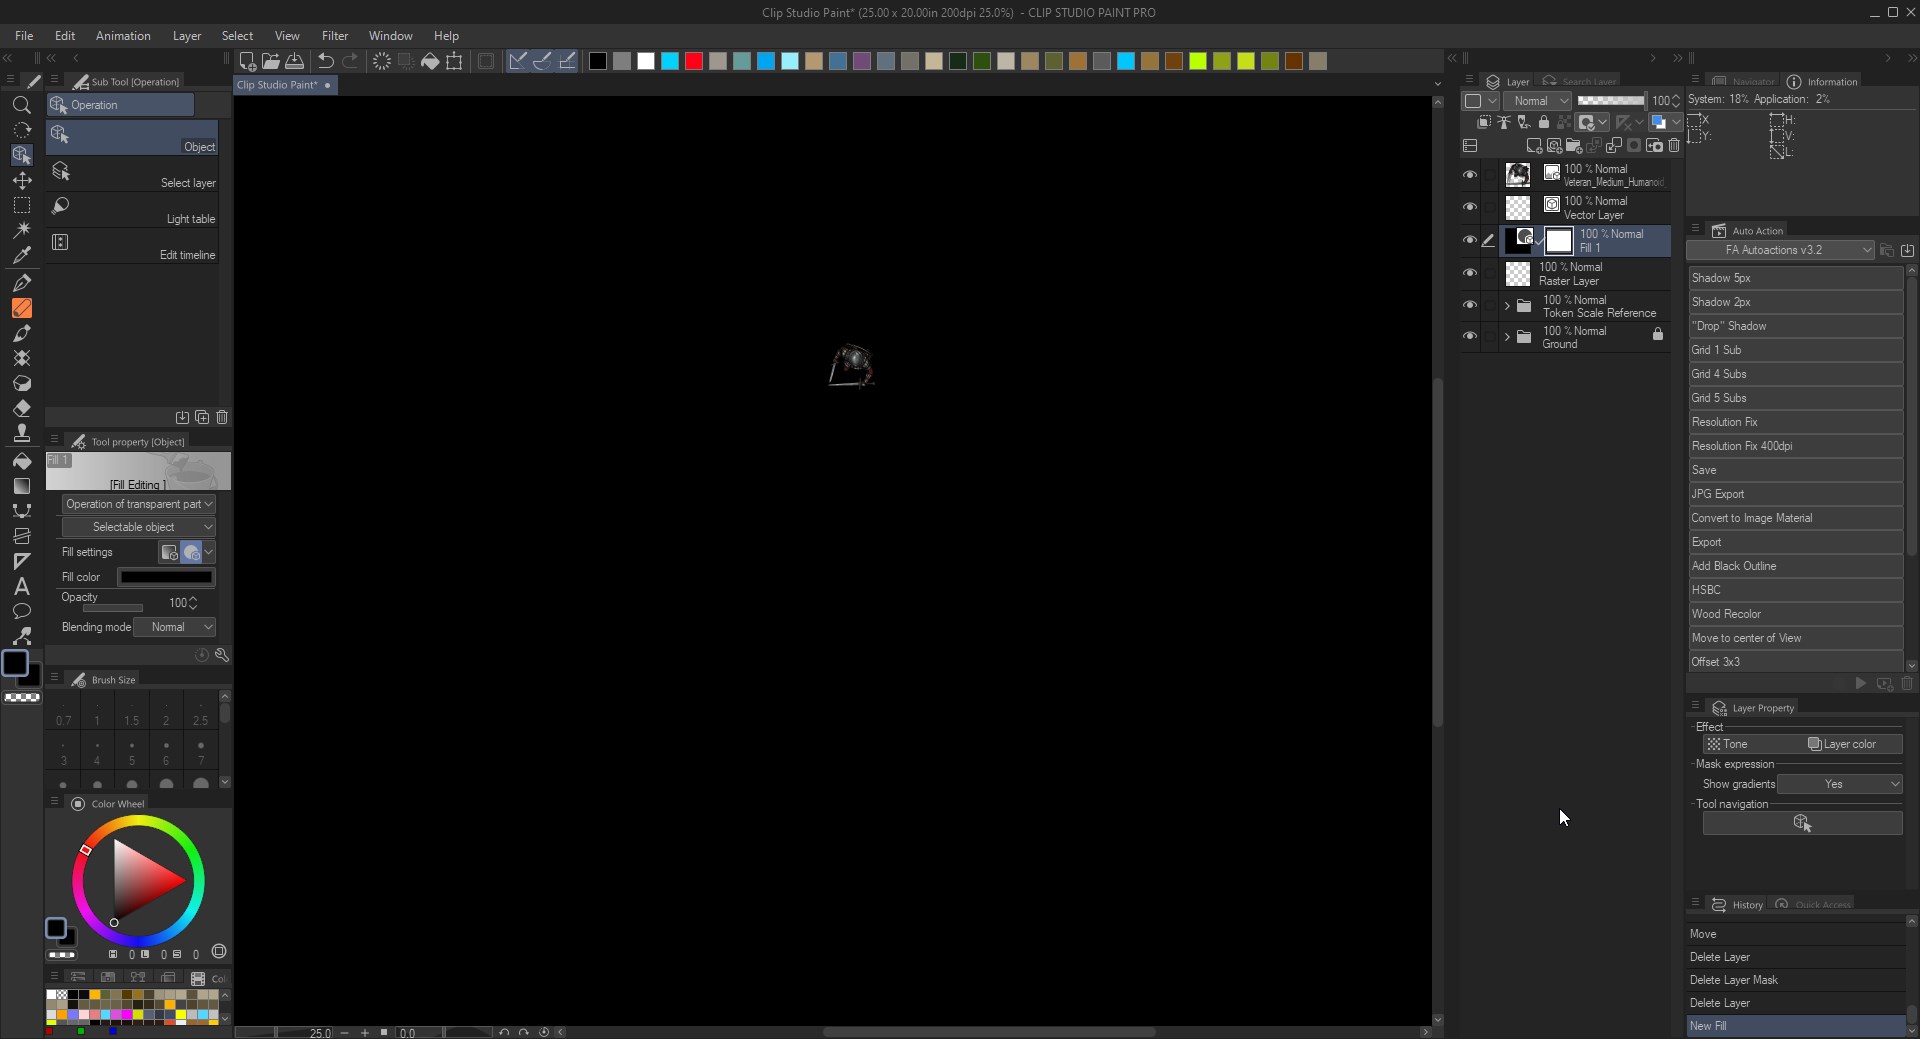
Opacity (transparency) of the layer can be adjusted with the slider in the top right corner of the Layer Panel. This copy of the “Veteran” token is set to 40%, which is shown next to its “Normal” Blending Mode above the Layer Name.
Opacity can be adjusted for all layer types and Blending Modes. Here all bottom half of the circles from previous examples are set to 50% opacity.
And of course you can combine all of this with the correction layers mentioned above as well, further adjusting brightness, contrast, hue, saturation and more 🙂
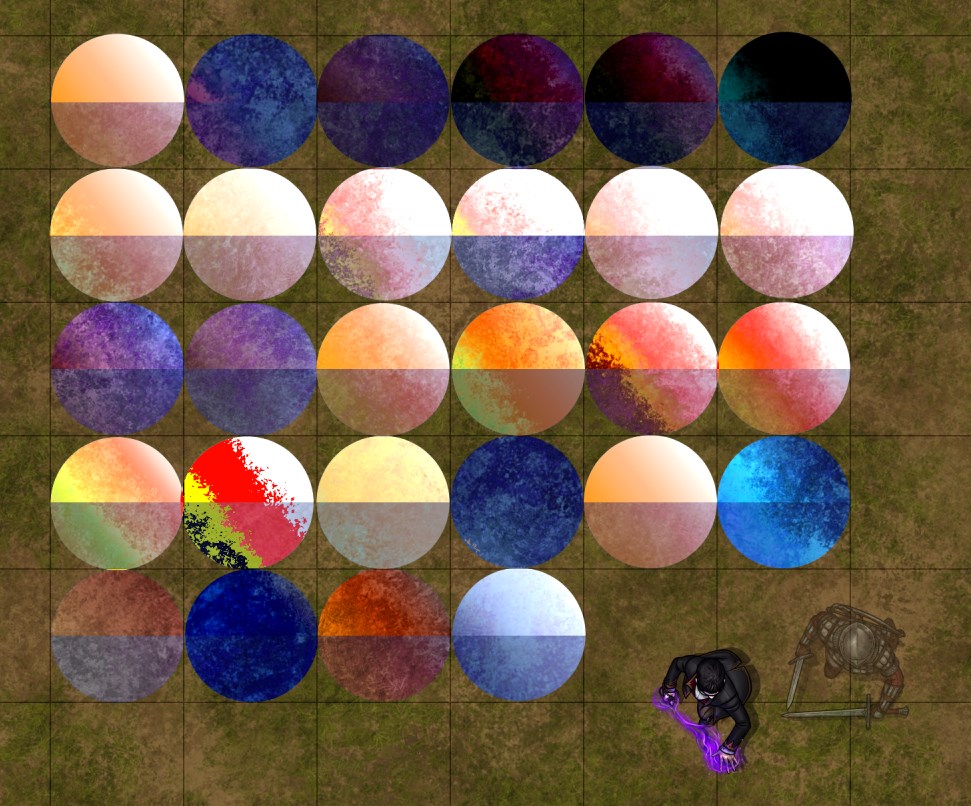
All of these options and combinations give you pretty much unlimited possibilities in how you can adjust and manipulate colors of individual layers or the overall atmosphere of the whole map.
Layer Folders
Folders are used for organization of Layers in the layers panel. You can nest folders within each other, and you can also use them to apply Blending Modes or opacity changes to multiple layers at once.
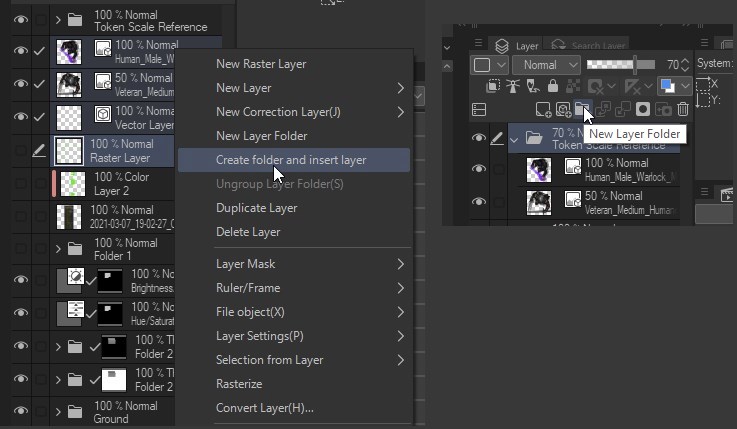
You can create new folders by selecting the layers you want to put in a folder,
Right click on the Layer Panel > Create Folder and Insert Layer.
Or to create an empty folder, click the “New Layer Folder” button.
Folders – Opacity & Blending Modes
The Opacity and Blending Mode of folders can be changed, with some caveats.
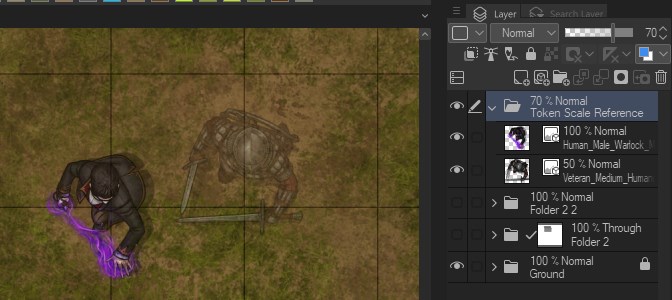
Opacity of Folders and Layers (or nested folders) inside them stack.
As you can see In the example below,
Warlock Token is set to 100%, and Veteran Token is set to 50% – However the Folder they are in is set to 70%.
Meaning the overall opacity of the Warlock Token is 70% (0.7*1=0.7)
And overall opacity of the Veteran Token is now 35% (0.7*0.5=0.35)
Blending modes also behave slightly differently with Folders.
First of all, Folders have their own Blending Mode option: “Through.” This Blending Mode simply let’s the Blending Modes of layers that are in the Folder to pass through.
All the gradient circles from our previous examples put in a folder with “Through” Blending Mode – They all keep their own Blending Modes.
Setting the Folder’s Blending Mode to any other “overrides” the Blending Mode of all the layers inside it in relation to layers under the folder.
However layers within the folder will still affect each other based on their individual Blending modes. So first the Blending interactions within the folder are resolved and then overall Blending Mode of the folder is applied on top of that.
Layer Effects – Outline/Border & Layer Color
Outlines – Border Effect
Generally, almost all FA assets have an Outline in addition to normal linework – That’s just part of the style. This means that if you are creating new objects with textures or using certain brushes, there is a good chance you’ll also need an outline to make those new assets fit in properly.
Outlines can be added from the ‘Layer Property’ window. The icon for it is an open circle.
Since the default color for the “Outline” is white in CSP, I’ve just made an autoaction “Add Black Outline”.
You can also add outlines to Folders – Although these only work as expected on “Normal” folders, not folder set other Blending Modes.
If you have the outline on both, the layers and on the folder, they’ll stack.
Layer Color Effect
Layer Color Effect is an easy way to place a 2 tone coloring on your layer. There is one use case where it comes in handy in mapmaking – making shadows out of assets in a non-destructive way. Can be applied to layers and folders, as usual 🙂
Layer Masking & Layer Clipping
The easiest way to describe Layer Masks is non-destructive erasing. But they can also be used for multitudes of other interesting things. Layer Masks are used extensively in CSP mapmaking for texture blending, combining assets & brushes, shadows, lighting, and many other applications. It’s one of the most versatile tools at our disposal.
How to Create and Use Layer masks
You can create a layer mask pretty much on any layer or folder by clicking the “Create Layer Mask” Button. Correction and Fill layers are created with the Mask already active.
As mentioned Above, the Layer Mask allows you to erase parts of the layer in a non-destructive way, which means that you can bring it back any time. With the Layer Mask selected, pick any brush and select the
“Transparent” color  to “Hide/Erase” part(s) of your image, and then any other color to “Reveal” them back. You can switch between “Color” and “Transparency” by pressing “C” on your keyboard.
Note:
Traditionally other software such as photoshop use black and white to denote transparency on layer masks (black being 0% opacity and white being 100%) CSP uses an actual transparent color to achieve this instead along with any actual color.
Since you can use pretty much any brush, there are lots of possibilities to create very natural and interesting looking transitions.
Instead of using brushes to “Hide & Reveal”, you can also use selections with the marquee tool. Remember both brushes and selections can be snapped to the grid (Ctrl+H to show/hide the grid).
The same rules apply when using selections: transparency “fill” hides and any other color “fill” reveals. You can use keyboard shortcuts for fills – “Delete” key is to fill with transparency and “Alt+Delete” fills with color.
Or using the “Delete outside selection” to keep your selection revealed and hide everything else.
You can also make the selection first, and then activate the layer mask.
You can also Invert the layer masks (Ctrl+I).
And since this is all non-destructive, nothing is permanent, so you can always adjust it.
Masks are “Linked” to the layer by default (indicated by a small checkmark between the layer thumbnail and the layer mask) which means you can move the layer and the mask together. You can also “Unlink” the layer mask from the layer by clicking on the checkmark, so they can be moved independently.
Side note: if the layer is an Image Material, you can move it independently from the mask with the object tool, without unlinking.
Holding a Modifier Key (Alt, Ctrl, Shift) and Clicking on the Layer mask will give you these results:
Alt – Shows you the masked area
Ctrl – Makes a selection of the masked area
Shift – Disables the mask
Side note: Ctrl+Click on the layer thumbnail makes a selection of non-transparent pixels of that layer (ignoring the layer mask).
You can also move masks from layer to layer. By holding down the Alt key mask will be copied instead.
Or “Stack” layer masks by utilizing folders. As you might imagine, Folder Mask will affect everything that’s put inside that folder. And you can have folders within folders – each with their own mask 🙂
Clipping Layers – aka Clipping Masks
You can “Clip” layers onto other Layers with the “Clip to Layer Below” (S) button on the Layer Panel.
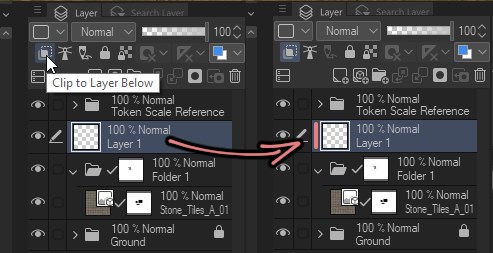
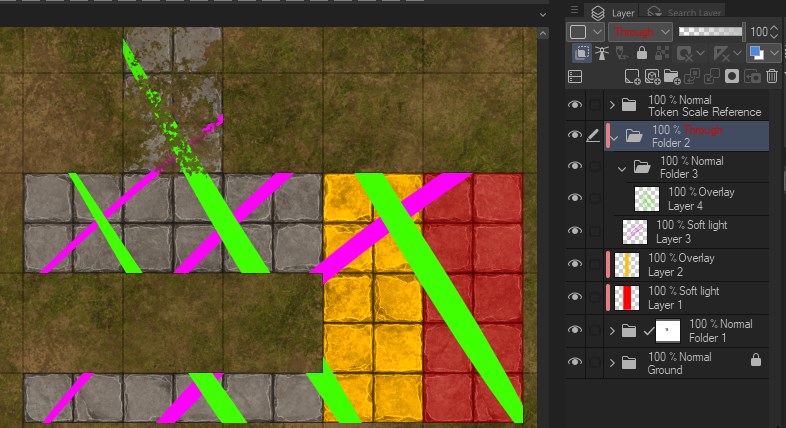
Layers that are “Clipped” at the layer below are indicated by the light red strip in front of the thumbnail.
Clipping masks allow you to use an existing layer or a folder as a sort of “Layer Mask.”
In this case we have the “Layer 1” clipped to the “Folder 1” (which is the same folder from our Layer Mask examples above). Anything drawn on the “Clipped” Layer will only affect the non-transparent pixels of the Layer/Folder it’s clipped to.
Easier to show than explain:
You can combine Clipping Layers and Layer Masks however you like. And you can clip multiple layers to the same “Base” layer. All clipped layers that are on top of each other affect each other, but all use the first layer as a “Mask”. So as you can see here, both the red and yellow layers are “Clipped” to the Folder.
And yes, you can even clip folders… which have other folders nested in them.
With an exception of “Through” Folders – you can’t clip a folder which contains multiple layers with different Blending Modes within. In this case “Through” Folder turns Red and just defaults to “Normal” Blending Mode. “Overriding” the Blending Mode of all the layers inside it in relation to layers under the folder.
However layers within the folder will still affect each other based on their individual Blending modes. So first the Blending interactions within the folder are resolved and then overall Blending Mode of the folder is applied on top of that.
Of course all of these tools can also be used with Correction layers, Blending Modes and opacity.
Btw, you can use the HSBC (Hue, Saturation, Brightness, Contrast) Autoaction to quickly create and clip those 2 correction layers to your selected layer 🙂
I’ve only used textures in the examples above, but you can use masks and clipping for pretty much anything – imagination and creativity is the limit.
As another example: using masks to make seamless transitions / combine assets.
To make a duplicate of a layer like I’m doing here, hold down ALT when moving the layer, either in the layer panel itself, or with the “Move Layer” tool.
Brushes
The whole CSP Brush Engine and the amount of Customization it offers is the main reason why CSP is the software of our choice for mapmaking. There is little you can’t do with the options they offer.
Brush Types
There are no “Brush types” per say since all brush settings and options are available for all brushes – you are not really locked into certain presets. However, based on how the brush is set up and used, especially for mapmaking, I have come up with certain helpful categories of brushes.
“Ribbon” Brushes:
Ribbon brushes have a repeating pattern as it’s brush tip – If the repeating pattern is seamless, it allows you to draw continuous lines of any length without any visible seams or breaks. For example, Cliffs or Walls.
“Randomized” Brushes:
Brushes can have multiple brush tips (assets.) If set up properly, you can achieve an effect where each time you click (or drag), one of the “Brush Tips” will be selected, and placed at random. Random rotation, size, gap, horiz/vert flip and other parameters can also be set and adjusted.
These can vary depending on what is customized, but some examples might be Trees, Larger Rocks or Planks.
“Scatter” Brushes:
Similar to Randomized Brushes – also utilizing multiple brush tips (assets) and randomization.
Very useful for smaller assets, where you don’t necessarily care about a specific placement and you just want to scatter them randomly over an area.
For example Books, Small rocks or plants.
Customizing Brushes
Like mentioned in the beginning of the section there is a huge amount of brush customization available. Going through and explaining all the options would probably take forever, and there could easily be a whole separate guide dedicated to it.
A lot of the options are pretty self-explanatory, and as with Blending Modes, I think experimenting and changing various sliders and knobs on the available brushes is the best approach to familiarize yourself with all the options.
I’ll just go through a couple of more specific options here, and also some general brush settings such as: how to “lock” your brush settings, set them as default, and also how to reset the brush to default settings.
Each brush has some options you can play with directly in the “Tool Property” panel.
 /
/  Locks/Unlocks the current settings of a brush, settings of locked brushes can still be changed, but they’ll revert back to the locked settings when you switch to another brush or tool.
 /
/  Is where you can turn on and customize the “Random” aspect of certain values and also customize some dynamics of Pen Pressure / Tilt or Velocity of your Pen, if you have a graphics tablet.
 Resets your brush to its default settings – Defaults settings being the initial settings of the brush (as it was imported), unless you override them with your own.
 Opens the detailed settings, where you have all the options available for every brush.
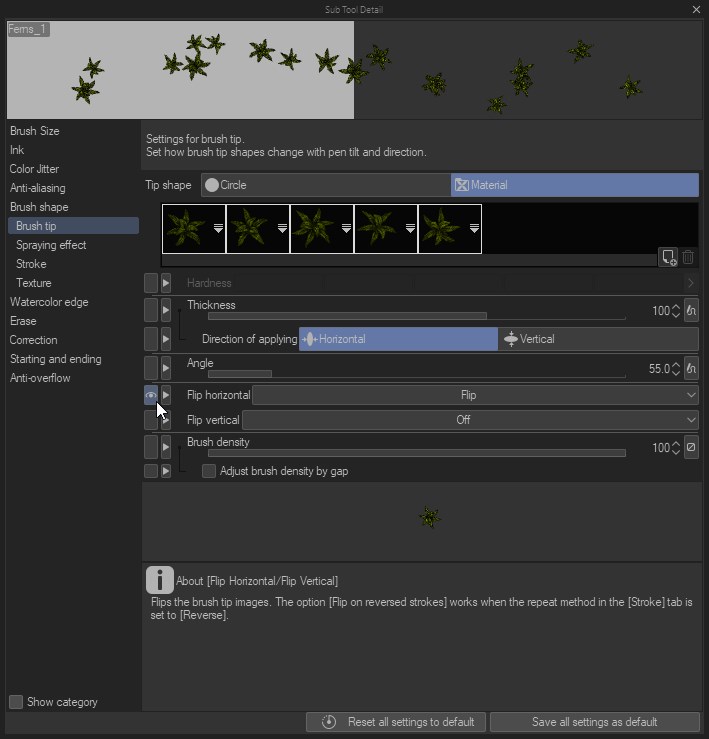
Detailed Settings Panel
As mentioned above, there are too many options here to cover each one separately, but many of them are pretty self explanatory. I would recommend just playing around with them testing what they do, and then you can always just reset the brush back to the Default settings, or re-import it if you completely screw it up 😛
The button at the bottom allows you to save your new settings as Default.
Clicking the Box  in front of every setting will display it in the “Tool Property” panel for quick access.
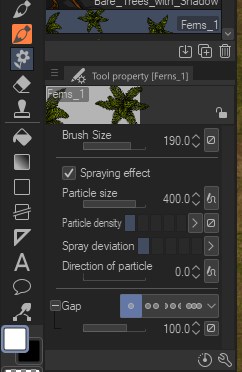
For Brushes that are set up with the “Spraying Effect” – Brush Size set’s the area in which you wanna spray in, Particle Size sets the actual scale of the Brush Tips/Assets.
Side Note: You can adjust the brush size quickly with a shortcut, hold Ctrl+Alt click and hold the left mouse button + drag on the canvas, to the right increases your brush size, to the left reduces your brush size.
To use the “Ribbon” Brushes with a mouse, Make sure you have the “Post Correction” turned on with the minimum of 3 / 5 strength, to prevent artefacts.
Cliffs and other similar brushes are pre-set to be used with a pen / pressure sensitivity.
To get the tapering effect on the start and end of the brush with a mouse, you can activate the “Starting and Ending” in the settings – Select the “Brush Size” as the variable and set “How to Specify” to “ by Percentage”.
Note: Probably turn off the “Starting and ending by speed” tickbox for better consistency, I forgot to do that in the example.
Registering a brush as a Brush Shape
Any Brush can be registered as a “Brush Shape” by going to Detailed Settings > Brush Shape > Add to presets
We are going to be utilizing “Brush Shapes” for some tools and also for vectors in the later sections, so it’s important to know how to do this.
CSP Materials Library
CSP has its own built in library where you can register/import assets, textures, etc. as “materials.” These materials can then be used for brush tips or just dragged into the canvas.
Registering Materials
You can import/register any layer or folder as a material by simply dragging and dropping into the materials window. If you drag in multiple layers at once, they’ll all get imported as a single material. Layers and Folders retain all their settings when imported, including layer masks and Blending Modes.
It’s impossible to import raw (jpg/png etc.) files directly, unfortunately. You can only import layers/folders. Which means you can’t easily import our gallery into the CSP Materials Library because you would have to do it one by one. That’s simply not worth the time investment in my opinion, since you can just import assets directly from the file explorer. It can still be useful however for frequently used assets, textures, or combinations of assets or textures, and is still required if you want to make a brush out of some assets.
Materials Window is collapsed by default, you can reveal it with the little double arrow like you can see in the beginning of the gif.
Creating Custom Brushes
Using pre-made assets
To use assets as brush tips, they have to be registered as materials first with “Use for brush tip shape” in the materials properties ticked (Open Material Properties by double clicking on the material).
You can also rename the materials in this panel. If your original layer names are just “Layer 58” you might have trouble finding the brush tips in later steps when you need to search and select the brush tips you want to use.
Repeat for each asset you want to use as a brush tip. Remember that you have to do it one by one, if you drag in all at once, all selected layers will be registered as one material containing multiple layers. Only single layer materials can be used for brush tips.
In this example I want to make a “Randomized” Pots brush. So I need to find one of the “Randomized” brushes that behaves closely to what I want to achieve and duplicate it. I chose “Stumps” in this example.
Then you can replace the Brush Tips for your new brush in the detailed settings > brush tip. Make sure your materials are named in a way that is easily searchable to save yourself a headache of finding them manually.
Tweak all the relevant settings – We are using PNGs with the same dimensions in this example, all pots are 200x200px which means our Maximum brush or particle size should be set to 200, anything higher would lead to upscaling and thus loss of quality.
Scale Randomization is achieved by Downscaling instead, which is much more forgiving as you are not creating new pixels, however there is also a “limit” with downscaling – in general you should probably not go below ~65% scale with “Normal sized” assets.
Our relevant settings for this brush are: Brush size set to Max 200 & Random – Minimum of 65%. Angle on Random – Strength 100%. Flip on Random. Repeat Method – Random.
 You can Hide/Show all the irrelevant/important settings for quick access and save all your settings as Default for this brush if you are happy with them. 🙂

As you might’ve noticed, we used pre-made PNGs that all have the same dimensions (200x200px) as brush tips for the example above. Using brush tips with varied dimensions in the same brush can cause unwanted upscaling and distortions, since the same Brush Size is applied to all brush tips, 200 brush size = 200px size.
This means you always want to have the brush tips “Normalized” to the same dimensions.
As an Example, here are 2 Map Assets, one is 200×200 the other is 400×200. Both are used as brush tips for the same brush.
At 200 brush size, with all random elements turned off for consistency, the 400×200 map gets downscaled to MAX 200×100. With the brush size set to 400, the smaller map gets upscaled to 400×400. Both of which are not ideal outcomes.

As mentioned above, you want all brush tips normalized to the same dimensions, so they are all scaled equally. We are just going to add some padding to the smaller map and make it into a 400×200 to match the larger one.
Right click > Rasterize the layer first, so we can edit it. Then make a 400×200 selection (snapped to grid 1sq = 200px) and use the “Convert to Image Material” auto action.
Register the new brush tip and test it out. Now that both brush tips have the same dimensions, the brush behaves as expected.
Custom Ribbon Brushes
Ribbon brushes require a seamless repeating pattern as the brush tip. This is not always easy to achieve, but here is a quick way of turning any straight asset into a “Ribbon”.
Cutting any straight asset in half creates a seamless transition.
Holding Shift while moving the layers will keep it aligned horizontally, just make sure you have it aligned to the grid on the sides without gaps. You can also “nudge” layers by 1 pixel using the arrow keys on your keyboard.
Use a layer mask to make a seamless connection/combine the 2 pieces as we learned at the end of the Layer Masking section.
Mask away the overlapping books. Select both layers, then make a selection from edge to edge (1sq/200px height – this is gonna be our Brush Size). Convert to Image Material, using the auto action.
You can check if you’ve done it properly by turning on tiling in the Object Tool properties.
Now you can create your new Ribbon brush, using the same process as before:
1. Register as a material 2. Rename 3. Tick “use for brush tip shape”.
 Find a brush that’s close to what you need, duplicate, rename, swap the brush tip and adjust the settings.
As mentioned above, with Ribbon brushes, the height of the brush tip sets the brush size – 200px in this instance. The repeating pattern can be pretty much as long/wide as you want.
Done.
Utilizing Vectors
Using vectors allows you to adjust and change your lines after they’ve been drawn. You can also have multiple independent “Lines/Points” on the same layer that can be edited separately.
For example, each click here is registered as a new line with a random brush tip – pot attached to it. Even though they are all on the same layer, they are still independent objects which can be moved around.
You can select individual objects with the Object tool and move them or edit some of their values in the Object Tool Property panel.
In order to use vectors you must be working on a vector layer!
Only individual clicks are treated as separate objects, if you draw a continuous line, even if it’s spraying down individual assets, the whole line is treated as one object.
More options for vector adjustments can be found in the last tool on the tool palette. There are a lot of options here, so I would recommend trying them out with different settings to get a feel for everything 🙂
Lines can have too many control points by default, which can be difficult to adjust at times.
You can simplify vector lines (reduce the amount of control points) with the “Simplify vector line” tool. You can simplify either just some parts of it, or a line as whole with the “Process whole line” checked in the same tool.
You can also swap the “Brush tip” of the vector back in the Object Tool properties with the help of Brush Shapes.
How to draw Walls – Use brushes with more precision
Of course you can grab any brush and just “free hand”, which works great for Cliffs or other more natural brushes. However if you need to draw perfect lines or simply want a bit more control over your strokes, there are multiple ways how you can achieve it. I’ll use walls as an example here, but the techniques can be used with pretty much any other brush.
Snapping to Grid & Rulers
All of the examples below are done on vector layers with vectors! (Though these tools of course work on raster layers as well.)
Make sure you have “Snap to Grid” active, activate your grid (no subdivisions – “Grid 1 Sub” Autoaction) and draw your walls, your brush or pretty much any other tool will now follow the gridlines.
Works fairly well for shorter straight lines, but it’s clearly limited to just vertical or horizontal lines.
You can also go around the corners with some practice 🙂
Rulers
CSP has a lot of useful rulers available which you can utilize to make pretty much any shape you wish. For our purposes the most notable ones are Curve and Figure (Rectangle, Ellipse, Polygon) rulers.
Make your desired shape with the help of the rulers and then use any brush of your choice to draw over the rulers.
You can disable snapping to rulers and grid on the bar on top, and you can also hide rulers on the current layer by shift clicking on the ruler icon next to the Layer Thumbnail.
Figure tools
The Figure tools are very similar to Rulers in the sense that you also have various geometric shape options available like straight lines, curves, rectangles, ellipses etc.
Difference being that you can attach brush shapes to figure tools directly, instead of making a shape with the ruler first and drawing over it with a brush.
Just make sure the Brush size of your figure tool matches the brush size of the Brush Shape you want to use it with.
Continuous Curve – Quadratic Bezier is usually the best option for more complex shapes, as it allows you to do both straight lines and curves with one tool.
Make sure you are working on a vector layer if you want to be able to edit your lines after you’ve drawn them!
Selection to Walls
Another option is to use our “Selection Walls” autoaction. Which also utilizes Vectors and Brush Shapes. It’s a very quick and easy way to make outer walls.
Block out the area you want the walls around with selection tools, press the “Selection Walls” autoaction which creates a simple vector line around your selection, then just change the vector properties in the object tool to your preference.
How to fix visible seams of closed loops
When you create a closed vector loop, there is always going to be a seam somewhere. Depending on the brush shape it might be almost invisible, but it’ll always be there.
You’ll definitely notice it on any brush with irregular shape like cliffs for example.
The simplest way in my opinion is to overlay the seam with another piece and blend the edges using layer masking.
AutoActions
Autoactions are essentially just a set of recorded tasks which get executed once you press one of the autoaction buttons.
You can generally only record tasks that can be executed with contextual windows – for example you can record making a new layer and switching it to overlay Blending Mode as an autoaction. But you can’t record making a stroke with a brush on a canvas.
FA Autoaction set explained
Shadow 5px / 2px
Both create a soft light blurred shadow around your currently selected layer or folder as a separate layer.
“Drop” Shadow
Creates a sharp drop shadow effect on a separate layer.
Grid 1/4/5 Sub
Sets number of subdivisions for the built in grid ( Ctrl + H )
Resolution Fix
Explained here
Save CLIP File / JPG Export
Just quick buttons for File>Save as and File>Export (Single Layer) > .jpg (JPEG)
Convert To Image Material
Converts selected layers or folders into an image material layer, honors selections and keeps the original layer intact.
Export Selection
Transfers all selected layers and/or folders to a new canvas for easy exporting. Size of the new canvas is based on your selection. Requires a Selection and “background layer” that is named specifically “BG” in your file (does not have to be selected, just has to exist in the layers).
Add Black Outline
Adds a 3px black border layer effect on the currently selected layer or folder.
HSBC ( Hue Saturation Brightness Contrast )
Creates 2 Correction layers, Hue/Saturation/Luminosity and Brightness/Contrast, and clips them to your selected layer.
Selection Walls
Explained here – under Selection Walls subsection
Wood Recolor
Creates Fill layers with correct presets to recolor “Light” wooden assets into “Dark” and “Ashen” variants, and clips them to your selected layer.
Move to Center of View
Explained here
Offset Autoactions
Used for creating seamless textures, makes 4 duplicates of the current layer each offset by 3-8 squares in a different direction, Offset merge – merges these newly created layers. Probably won’t be very useful for general mapmaking.
Exporting final images
You want to export your final map as JPEG to keep file sizes as low as possible without sacrificing too much of the quality.
Easiest way:
JPG export Autoaction > Set the quality to 80-85%
You won’t see any difference in the actual quality and the file size will be roughly 60% lower compared to JPEG at 100% quality.

