No products in the cart.


Preface / Basics
We use the art software Clip Studio Paint PRO (CSP) for all of our drawings – therefore this Styleguide is made in and for CSP. To follow it effectively you should already be familiar with the basics of CSP (check out pins in our #help channel on Discord) as this guide will reference tools, layer masking, layer clipping, brush settings etc.
I’m also using a graphics tablet for all my drawing, so if you only have a mouse, some of these methods won’t work properly for you as they require pressure sensitivity.
This styleguide is NOT the “Only Way”, the “Right Way” or most likely not even the most optimal way to to do things, it’s simply to show what my (Stryxin) workflow looks like and how I produce FA content.
-
- If you prefer some other way of doing things that achieves the same thing? Cool, do that. Whatever works for you!
- If I’m doing something horribly inefficient and you have a tip how I can improve my workflow, please let me know!
- If you strongly disagree with something in this guide and want to tell me how my way is stupid or wrong or otherwise express your feelings about it, please feel free to email me at [email protected]
- If you prefer some other way of doing things that achieves the same thing? Cool, do that. Whatever works for you!
Terminology:
Brush
-
- There are multiple tools in CSP that I’ll be clumping together under the term “Brush”, simply because they are all essentially the same tool, with same options, just set up differently -> “Pen”, “Brush”, “Decoration”, “Ribbon”.
Outline
-
- “Border Effect – Edge” in CSP

PPI
-
- Pixels Per Inch, we are using “1inch” Grid as our scale, 1 grid square = 1×1 inch = 200x200px, 200ppi = 200x200pixels per grid square.
PPI / DPI / Pixels per (grid) square are interchangeable terms in this guide.
- Pixels Per Inch, we are using “1inch” Grid as our scale, 1 grid square = 1×1 inch = 200x200px, 200ppi = 200x200pixels per grid square.
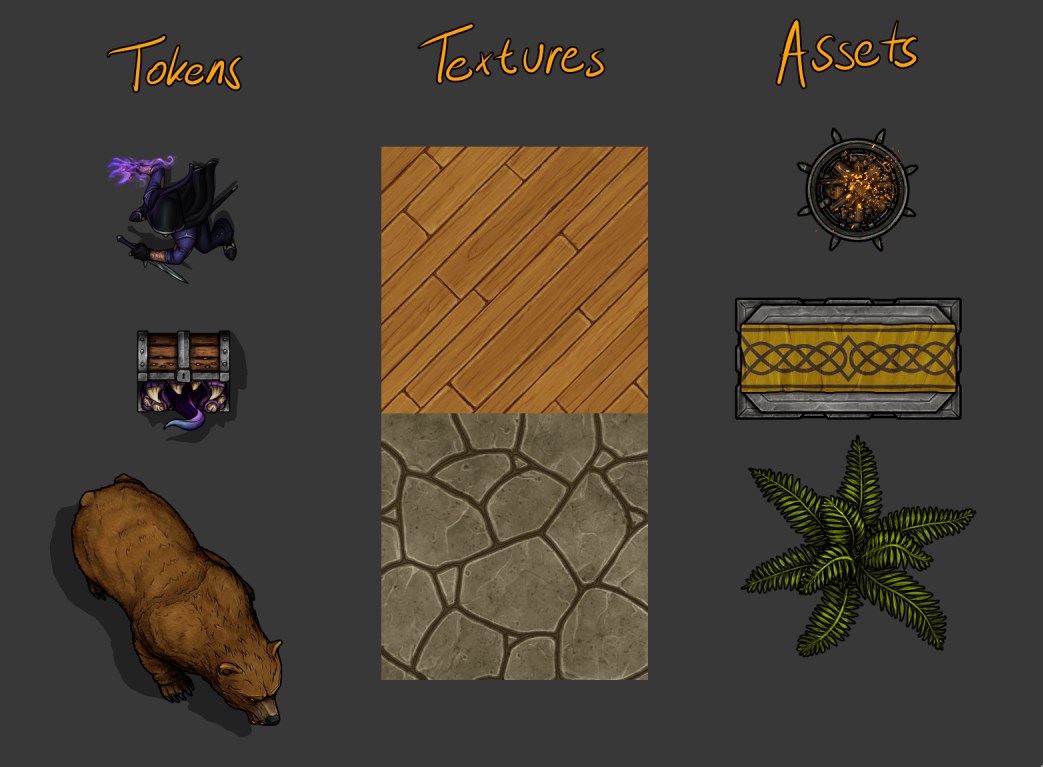
Tokens
-
- Characters, Monsters, Creatures ( Wolf, Human Paladin, Dragon etc.)
Textures
-
- Seamless pattern representing certain surfaces. ( Wood, Metal, Grass, Water etc. )
Assets / Object
-
- Inanimate objects, vegetation,. Anything that’s not a Token or a Texture ( Tables, Barrels, Plants etc.)
Download Resources
Assets Package
This package has all the tools and resources you’ll need to follow “Creating an Asset” section:
-
- Premade Material Textures (Wood, Metal, Rock & Marble)
- CSP Brushes used in this guide
- FA Autoaction Set v3.0 for CSP
- CSP File – containing all the assets showcased in “Creating an Asset” section + some additional ones so you can look at layers, take them apart and study them if you wish.
Download “FA Styleguide Assets Package”
Canvas & Grid Setup
Canvas setup
- Canvas should be set to inches (In) with 200 resolution (ppi).
- All of our Assets & textures are drawn at 200ppi.
- All of our Tokens are drawn at 400ppi.
- Size of the canvas (Width & Height) should always be in full squares. ( 1×1, 2×4 etc.)
I suggest to start with a bigger canvas, you can always crop/make it smaller later.

Grid Settings
Gap should be set to “1.00” in, if it says px instead of in your canvas units are not set to inches. (see above)
Number of divisions is relative to what you are working on. I usually use 1, 4 & 5 and swap between them.

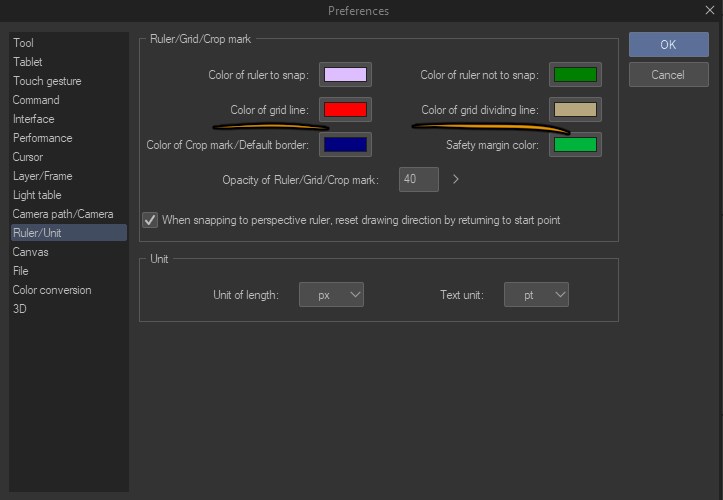
Tip: I recommend setting up a different color for grid lines and “grid dividing line” in File>Preferences>Ruler/Unit
Brushes
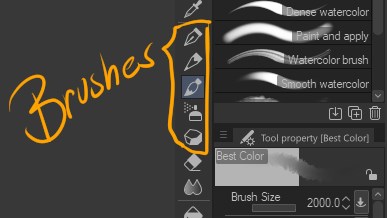
The majority of our content is made with 2 brushes
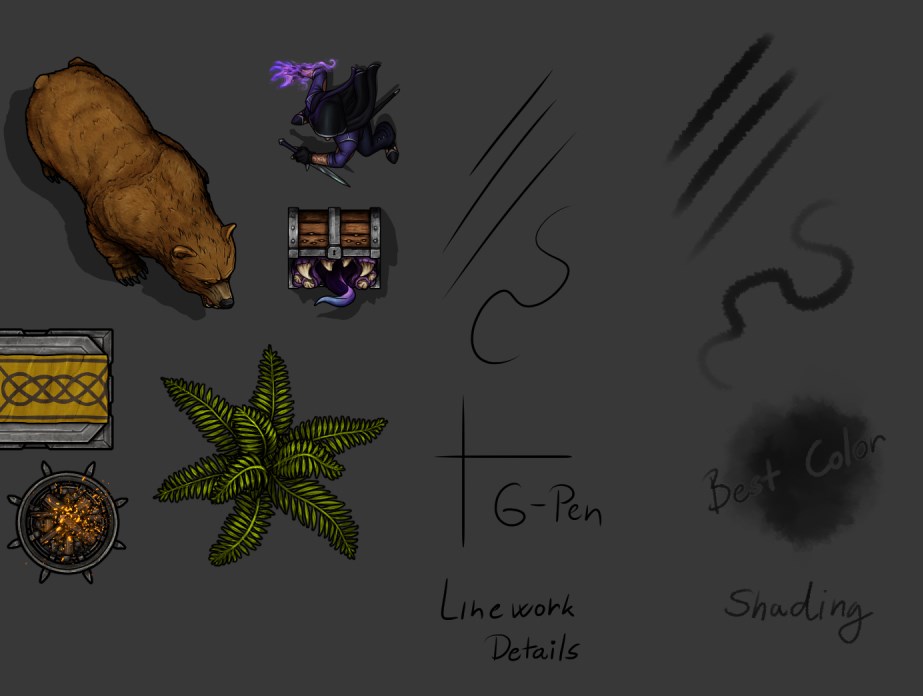
“G-Pen” – Linework and details – available in CSP by default
“Best Color” – Shading/Coloring – brush which can be found in our CSP Brush bundle under “Drawing & Painting”
Some other brushes that are used frequently:
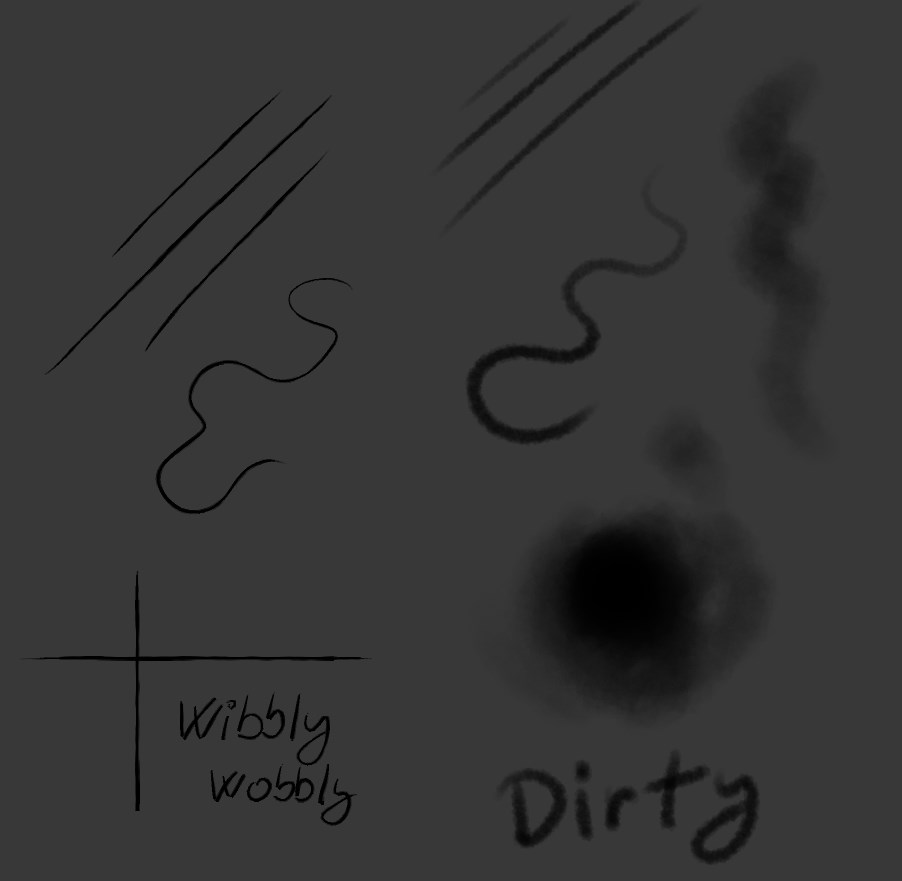
“Dirty” – similar to “Best Color” but without blending/color mixing
“Wibbly_Wobbly_v2” – Similar to “G-Pen” but with random variation/imperfections built in.
Shapes, Outlines, Linework & Scale
This is where my workflow differs from how it’s done traditionally in digital art, I use Shapes and Outlines heavily. It’s just how I prefer to do things because it’s easier for me and I think it has some benefits over the traditional Linework + Color Fill method.
Outlines
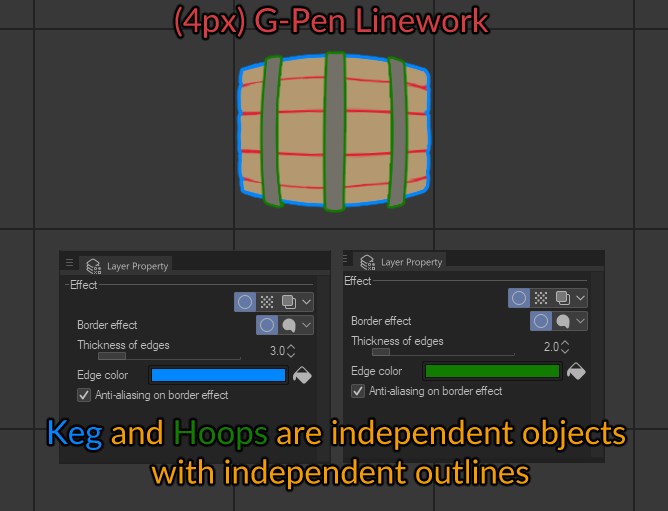
“Border Effect – Edge” in CSP is used heavily in my asset creation process. This effect puts a consistent line of a desired width around your object that is updated in real time if you make changes to the layer (or group) it’s applied to.
Linework
Linework is still used for everything that’s not done with outlines.
Linework is done with the G-Pen (3-6px depending on the asset size – explained below.)
For “Medium to Large” sized assets (anything from half a square to ~4 squares) the Outline is set to 3px and linework is usually done with ~4px G-pen – brush size is pressure sensitive and thus variable, main lines should roughly match the outline and details should be thinner.

Scale
We are working with the standard tabletopRPG scale where 1 inch on the grid = 5ft. But gameplay and clarity at lower zoom levels are more important to us than 100% true to real world scaling. Most of our assets and tokens are slightly oversized compared to their real world counterparts.
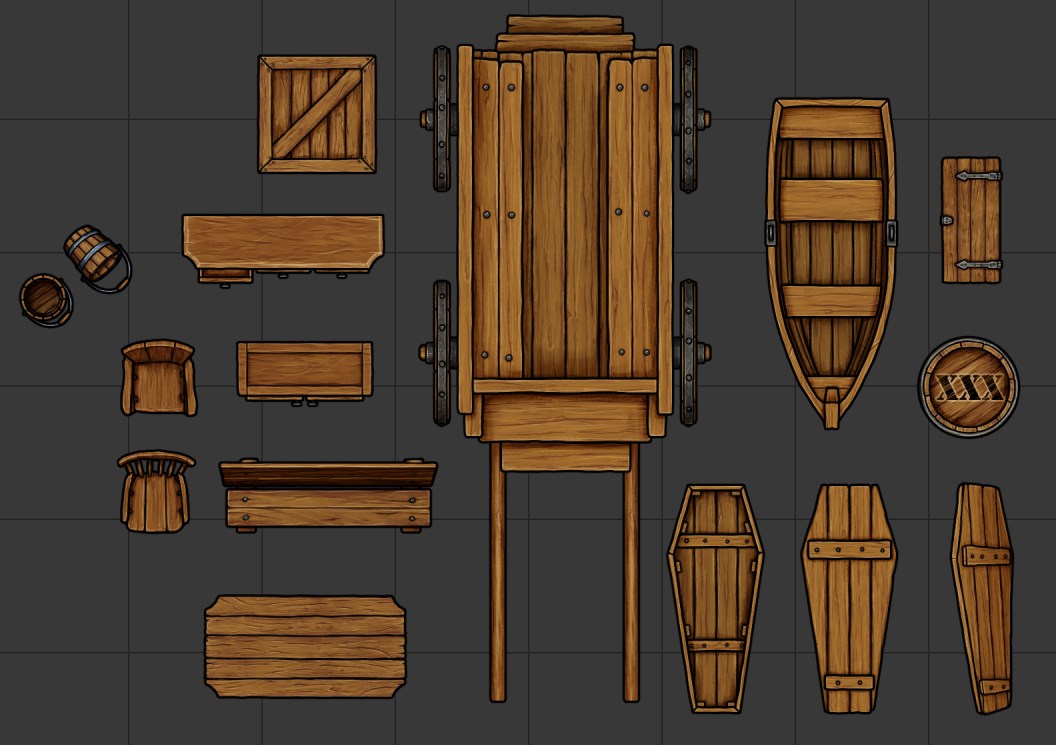
So while keeping real life measurements in mind, we usually scale against other finished assets and tokens.
I always have multiple finished assets placed on the canvas next to what I’m currently drawing for comparison. This ensures that the asset I’m working on will look correct next to other assets once it is finished.
Working on a Keg example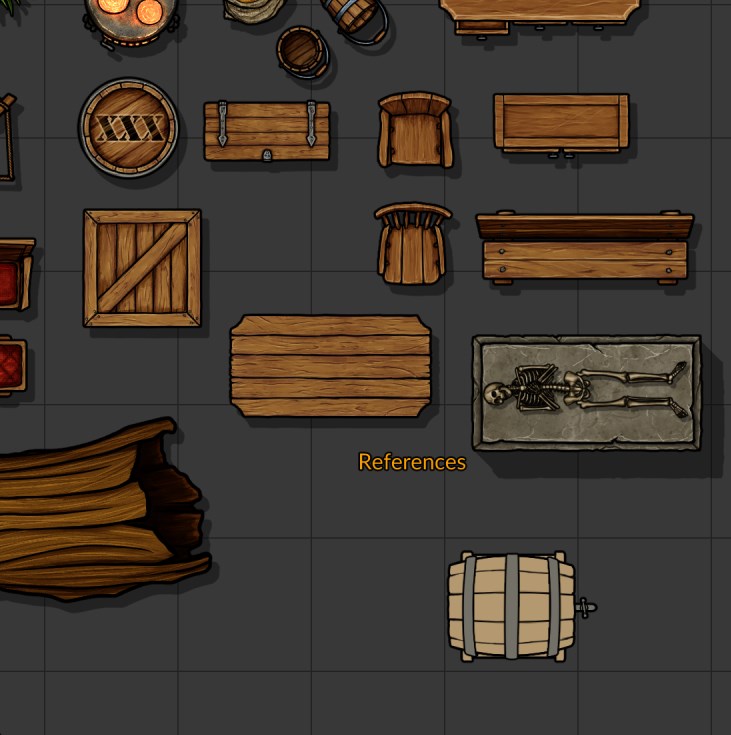
Outline width changes based on the object size/scale:
Tiny objects – 1px ( Candles )
Smaller objects – 2px ( Plant, Sconce )
Medium & Large – 3px ( Keg, Table, Wagon ) – Standard – New Updated Standard is 2.5px
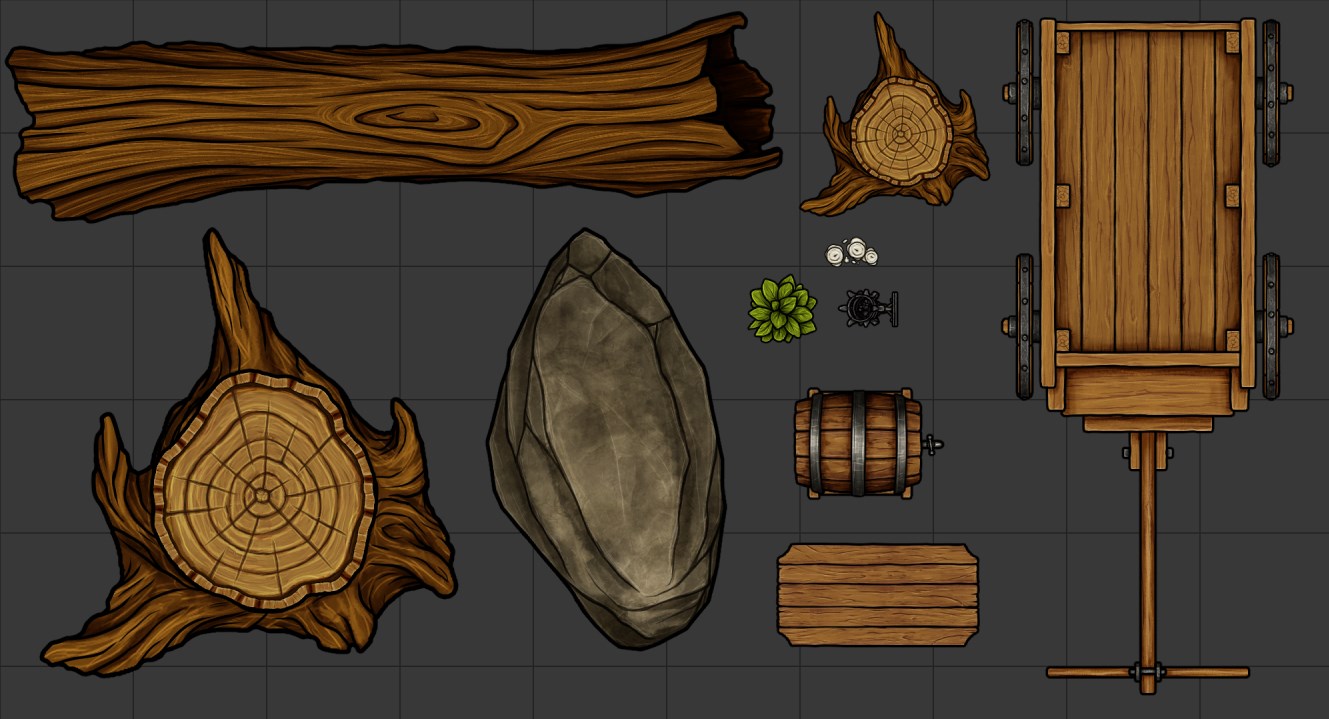
Overscaled – 4 to 5px ( Boulder, Large Stump, Log ) These assets are usually drawn at larger scale on purpose, as the scale they are supposed to be used at is variable – the outline for these assets is thicker so when they are scaled down the outline width matches the Standard (~3px) ( As you can see on the scaled down stump next to the wagon )
Why I prefer Shapes & Outlines:
-
- Outline is reactive to the base shape and therefore is easily adjustable. So you can start with basic shapes and transform them into what you need. I think the process is similar to something like 3D sculpting / modeling. Comes in very handy in the next step for Imperfections!
- Making various parts of the same assets as basically it’s own assets / separate shape let’s you move them around easily, without redrawing anything. Or even use them elsewhere. Or swap them for something else, making more variations easily.
- Consistent Outline Width across all assets
Drawbacks:
-
- The main drawback is a large number of layers and layer groups when working on a complex asset – compared to the traditional way. As each asset is basically “constructed” from separate smaller modular parts.
Shapes & Outlines style in this example doubles the needed layers and that’s just a simple anvil, made out of the “Base” and “Head” – as each part needs its own linework/shading & color/texture layers. You can imagine how many layers and layer groups you’ll need for something much more complex, if you want to keep it modular. This of course also means higher Clip File sizes if you care about that.
Where on the other hand, the traditional way will basically always follow the same layer structure of Linework, Highlights, Shadows, Color Flat/Texture, Base Fill.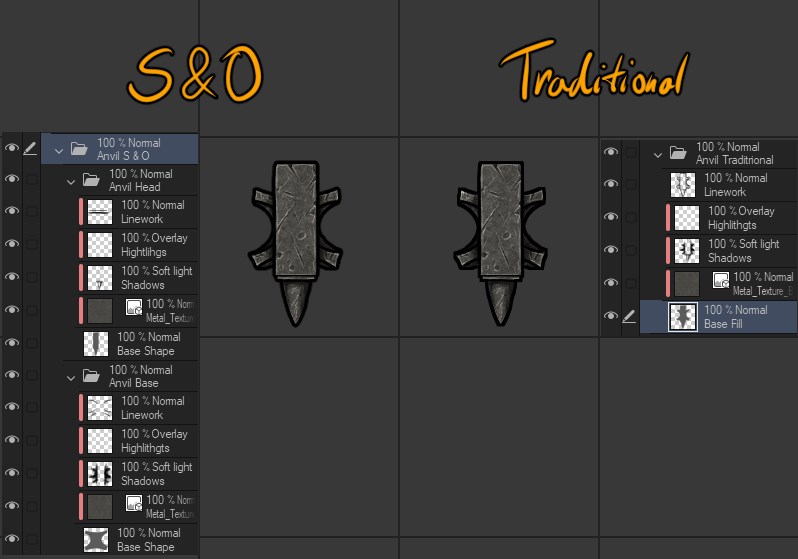
Note: When using S&O make sure your Outline is applied to the GROUP not the base shape itself.
True Top-Down
All of our Assets and Tokens are drawn from “True” top-down – Orthographic view/projection.
This means that objects are not warped by perspective/position of the camera. There are a couple of exceptions if absolutely necessary but you should try to generally avoid perspective projection.
The diagram below shows the differences between Perspective and Orthographic projections. As you can see, the Perspective projection warps the dimensions of the objects based on the “Camera” position.
The Orthographic projection keeps the dimensions the same.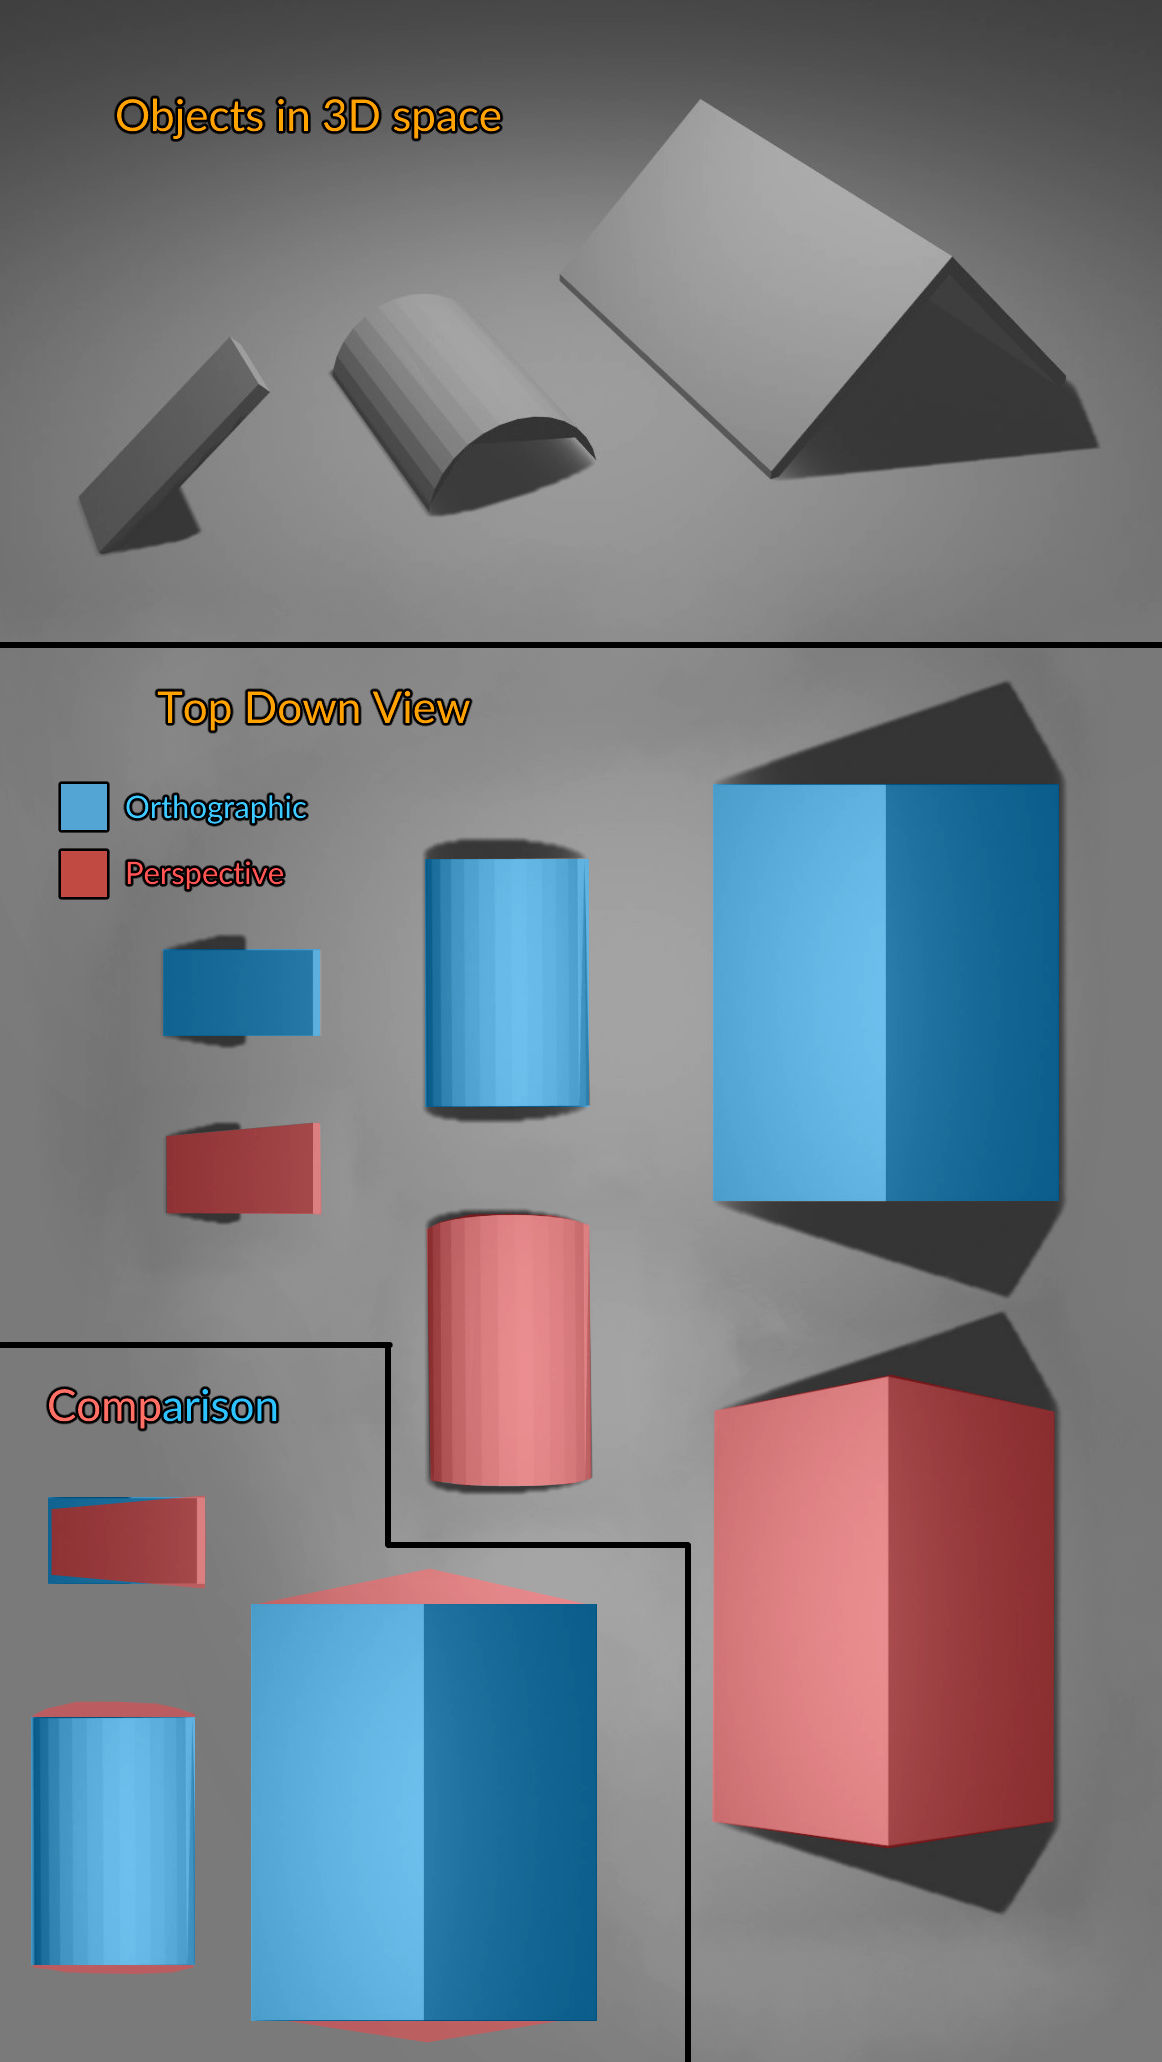
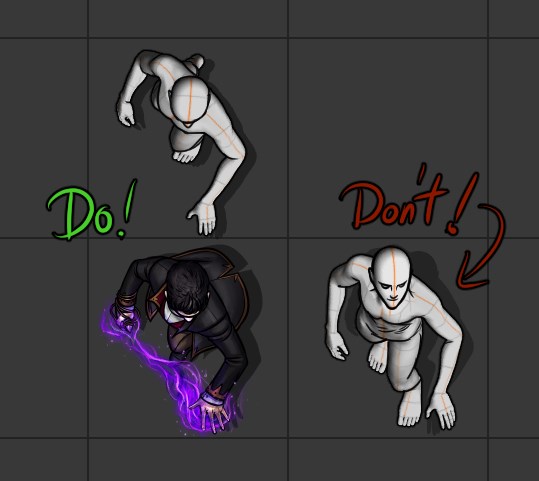
The same rules apply to tokens: Try to keep them in top-down, orthographic view. No “broken neck” and “falling backwards” poses, please.
If you don’t like my way of doing things and disagree with something please refer to the Preface…
Creating an Asset
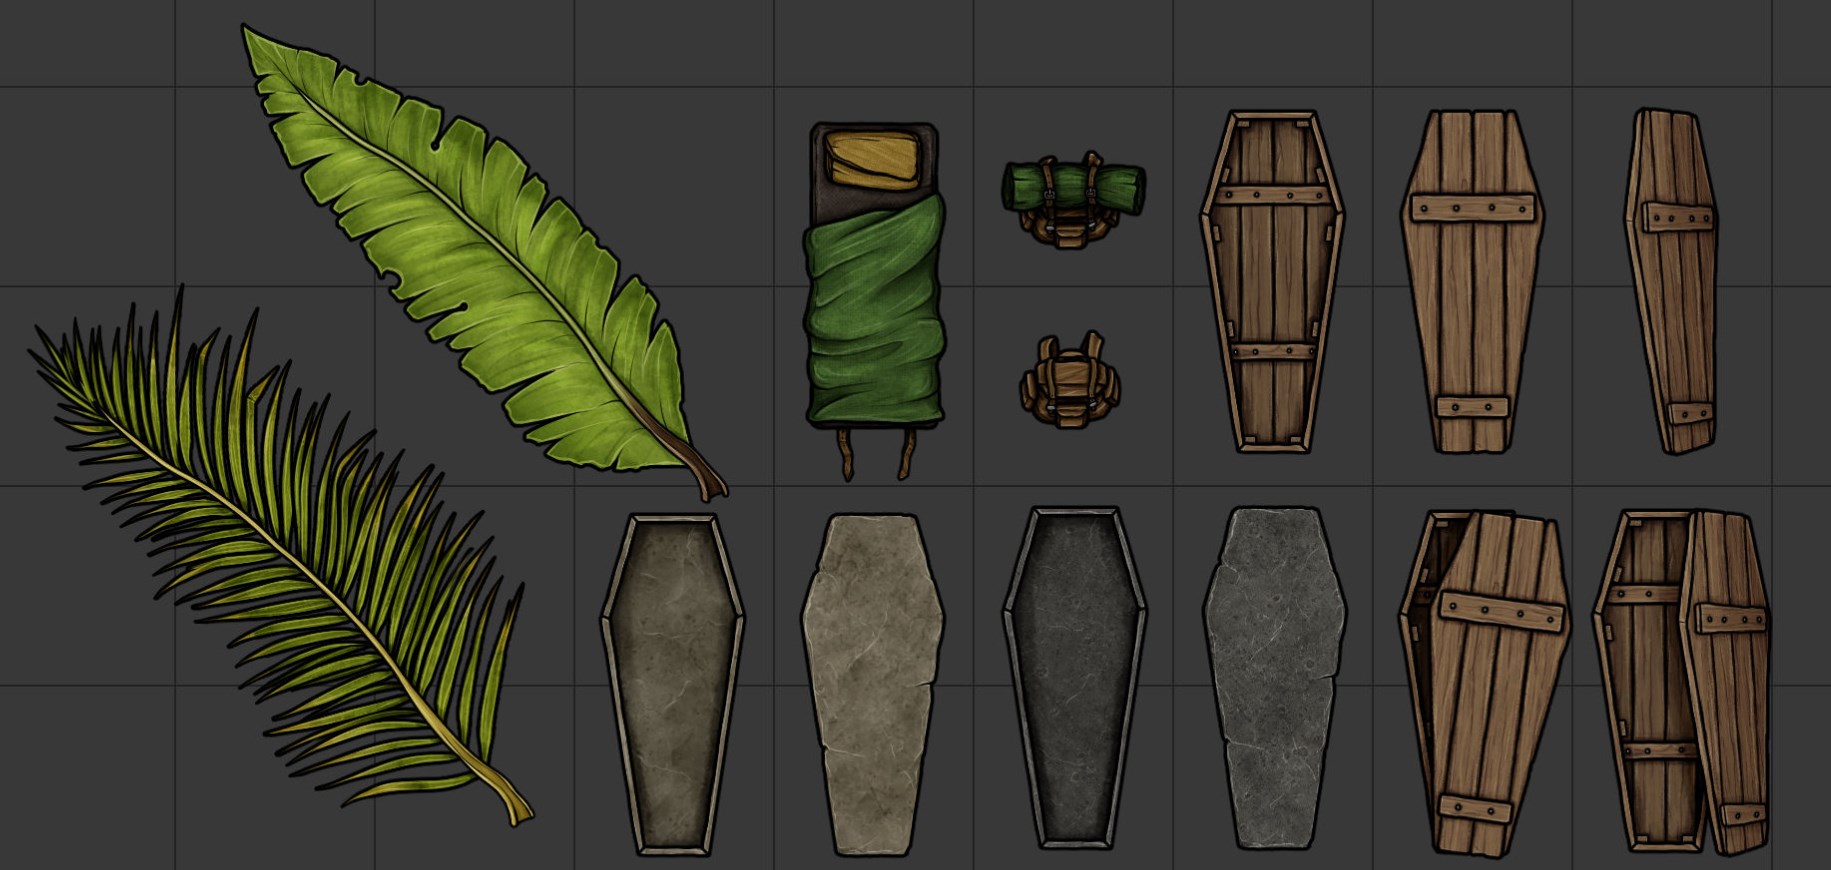
In this section we will create all these Assets – Bedroll, Backpack, Coffin & Palm Leaves – Step by Step.
Video showcasing the whole process from start to finish
https://www.youtube.com/watch?v=gDxplrtsbH0
Step 0 – Sketch / Direct Reference
In this step you should get a rough shape and scale of your asset – compare the sketch / reference with other assets and tokens.
Sketch:
If you are making something more complex, you probably wanna start with a sketch – get some references of what you are trying to draw and sketch out the basic form.
You can be as messy as you like, the point of this step is to just get the rough idea and shape of what you are drawing and scale it properly.
I usually use G-Pen for sketching, at 4-5px brush size. I also use selection + transform tools to reshape/rescale & move parts of my sketch.
TIP: You can press “C” to swap between “Normal Color” and “Transparent Color”, Transparent color essentially turns your current brush into an Eraser. I rarely use an actual Eraser tool, because switching to “Transparent Color” is much quicker and more convenient.
Rough sketches of Bedroll and Backpacks. 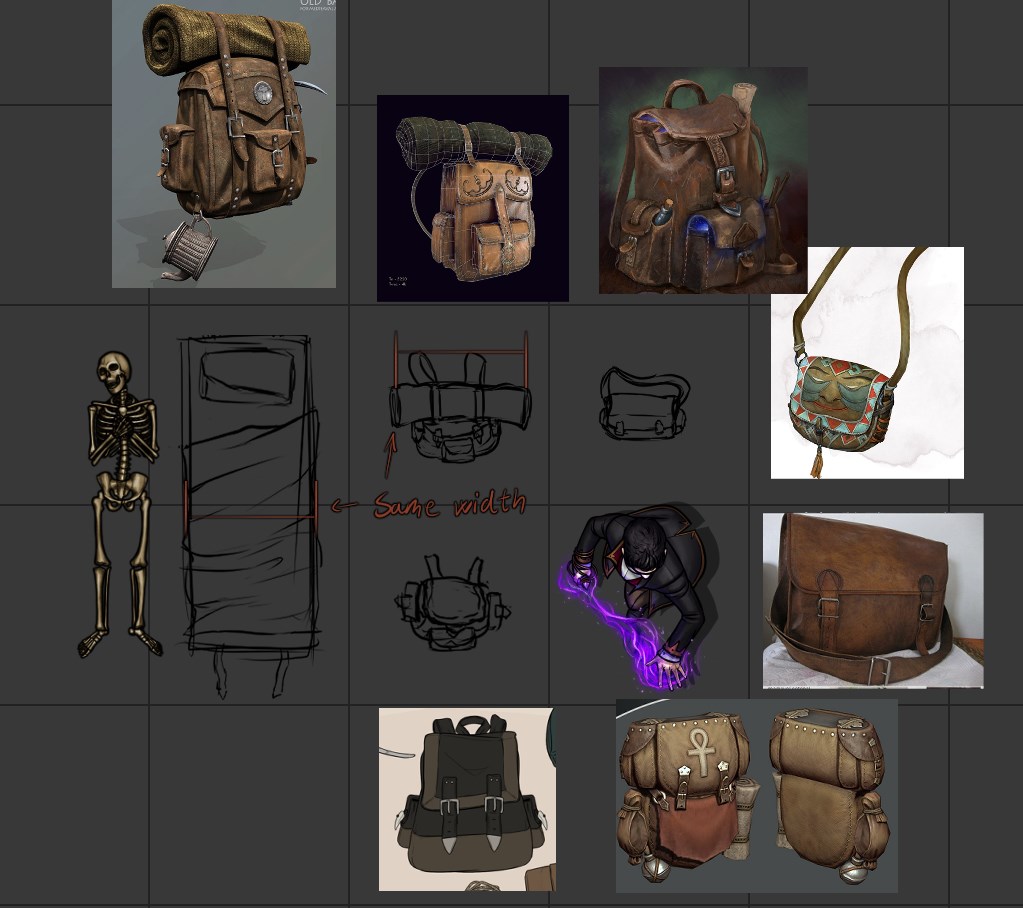
Direct Reference:
If you have a direct reference that you can essentially trace, making a sketch of the same thing would just be a waste of time – unless you wanna make some changes, in which case you can sketch over it. Otherwise, just do the scaling of the reference itself and move to the next step!
You should Center your sketch/reference on a grid both vertically and horizontally – This might be very helpful when you are working on something symmetrical and also if you need to space out something evenly.
Scaling and centering of Direct Reference – Screenshot of a 3D Model Coffin made in Blender.
Images / photographs , 3D models or screenshots from video games are a good resource, or if you have a sketch from someone else 🙂 Just keep in mind that if you are using 3D models or Screenshots from Games etc. they’ll be most likely warped by Perspective/Camera position, so you’ll have to make some adjustments to negate that.
Also, this should be obvious but… don’t copy someone else’s art 1:1 🙂
Example 1 – Coffin: Screenshot of a 3D model that I made in Blender used as Direct Reference.
Example 2 – Palm Tree Leaf: Our Fern assets used as a Direct Reference and also for scaling.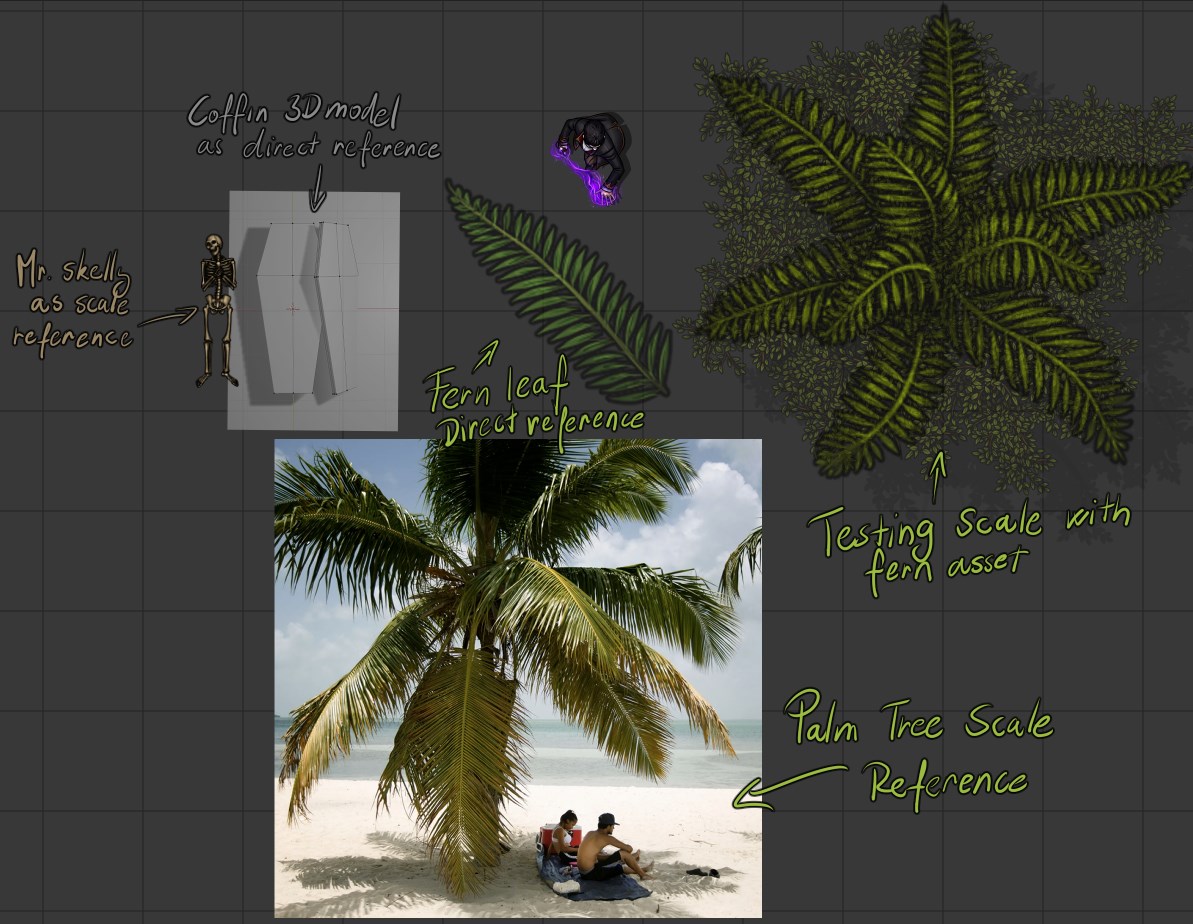
Step 1 – Mockup
I start most of my assets with a quick Mockup – Mockups are objects built out of basic shapes and outlines.
Make sure the whole asset is scaled properly if you didn’t scale it already in the Reference / Sketch step – compare with other assets, tokens and possibly measurements of real life references. Scaling after this step could lead to some unwanted artefacts, blurry lines or wrong line widths – all fixable issues, but still unnecessary work that can be avoided.
Then you can start to block in your Base Shape. Rectangle and Ellipse selection tools snapped to grid are your friend while working on symmetrical objects and can speed up this process immensely.
I often make just one side of the object and then duplicate and flip it on the other side, that way I’m certain that it’s centered and symmetrical.
Half of the Base Shape of the coffin is blocked out with Rectangle & Polyline Selection tools.
Filled in with brownish color, Outline applied to the folder.
Duplicate and flip to create the other half.
I used the “Transform Tool (Ctrl+T)” with the “Keep original image” selected. This allows you to essentially create and manipulate a copy of the object on the same layer while keeping the original shape intact.
More complex assets are built from multiple independent objects/shapes soI also get the group/layer structure in place, separating all parts of the object.
Asymmetrical and more “fluid” assets are usually blocked out by free-hand using a combination of Selection tools and G-Pen. While also trying to get some layer structure in place.
Backpack Mockup example – Top, Bottom and Pouches of the backpack are all separate objects.
Direct References and Sketches compared to Mockups. These assets now have proper layer structure and are built out of multiple objects.
Below are some Layer structure Examples.
Each subgroup has an Outline which creates the majority of “Linework” of these assets.
You don’t want to stack Outlines, so “Bedroll” folders don’t have outlines, only the last subgroups that contain actual Base Shape do:
– Pillow, Sheet, Mat ,Straps – for the “Bedroll Asset”
– Straps, Bedroll, Straps, Top, Pouches & Straps, Bottom – for the “Backpack Asset”
Layer structure of the Bedroll and Backpack.
The Blue-ish marked layers are the Sketches clipped to the object folders – They will be removed and replaced with proper linework in the next step.
Another example of a layer structure. Even though this is a finished asset, the layer structure was done in the Mockup stage. As you can see Floor, Sides, Seats & Edges are all basically independent objects creating one asset.
Modularity is quite a big part of our Assets. Some assets are done by drawing individual parts, “Building Blocks”, that are then put together to form a larger/more complex asset(s).
Example 1: Individual Planks of various sizes drawn separately are put together to form wooden walkway tiles.
Example 2: Individual leaves drawn separately then combined to form Ferns.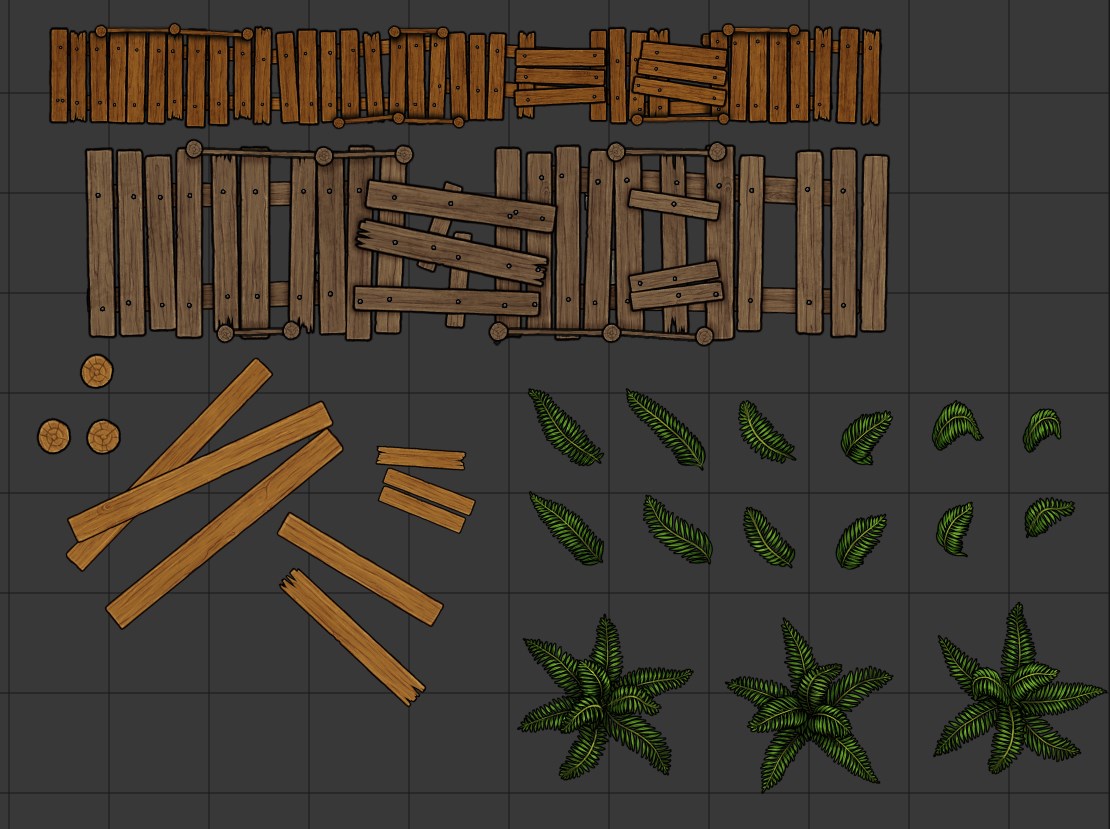
Step 2 – Refining Base Shape & Imperfections
When you are done with your mockups, it’s time to refine the “Base Shape”, essentially just clean up and finalize the silhouette – so they are ready for details and linework.
If your asset is made out of perfect shapes, you’ll probably want to add some imperfections. We want to generally avoid perfectly straight lines, pixel sharp corners and perfect geometrical shapes in general.
Just select the Base Layer and add a little imperfections with G-Pen – either add a couple of pixels or switch to transparent color and erase a little bit here and there.
These seemingly tiny changes make a huge difference in the end, as they add a lot of character plus some wear and tear to the objects, making them look more realistic and less artificial.
Before / After – Refining and Imperfections ( + a little bit of linework ) 
Step 3 – Details & Linework
When your Base Shape is done, you should begin to add all your details. Using G-pen, adding the details as a “normal” layer that’s clipped to your Base Shape.
Set your sketch to low opacity and use it as a guide. Keep the “main lines” roughly the same width as the Outline of the asset. Finer details can be thinner, just be careful because it’s also very easy to put in “too much detail”. Using Vector Layers for your linework might come in handy.
Going back to imperfections, have the pressure sensitivity for brush size active, you want some line width variations in there.
Keep in mind that most people will play maybe at ~35-50% zoom levels, so while you work on your asset, try to zoom out once in a while and look at it from that distance. You don’t want the details to get lost or become a blurry mess at that scale.
Comparing with other assets we’ve made (preferably new ones) should also help in this step.
Tip: Use “Wibbly_Wobbly_v2” brush instead of G-pen for thicker straight lines, it has some built in imperfections so you can snap it to the grid – it’s still straight, but not perfect.
Wibbly Wobbly used for the Vertical plank lines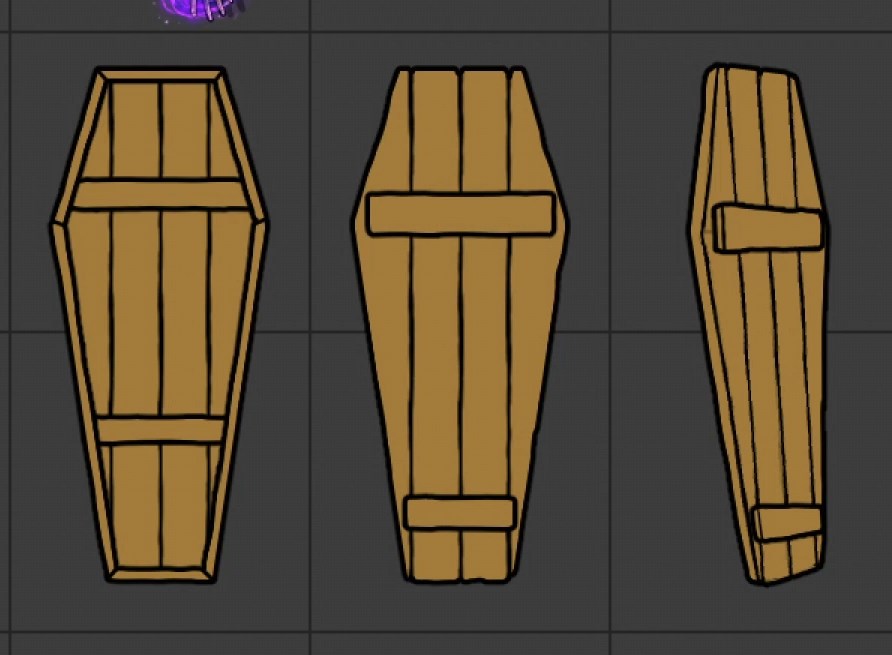
Going back to Modularity; sometimes, the easier/better way is to just add some specific detail as another Shape, basically creating the detail as another separate object. Especially if the detail is made out of some other material/texture/color or if it’s something you might wanna move or reuse somewhere else. You can see me do this in the mockup stage where I separate Pouches of the backpack, or horizontal planks on the coffin, that way I can easily hide these parts or change them and make variants without the need to redraw the whole asset..
Before / After – Linework & Details
Step 4 – Premade Textures & Custom Texturing
All of our assets are available in multiple color variants. This means that the layer structure has to allow for easy recoloring. If the asset consists of multiple recolorable parts ( different materials / colors ) all of them have to be independently changeable – This is especially true for Tokens.
This means Flat Colors and/or Texture layers are completely separated from Shading and Highlight layers so they can be easily swapped or changed.
Premade Textures:
We have some premade textures for these materials:
Wood, Metal, Rock and Marble (We might add more later if needed)
All objects made out of these materials use these textures, this way the color and the overall look of all assets made from the same material is consistent – it also saves a lot of time 🙂
There are also some matching Wood & Metal Ribbon brushes for smaller surfaces or curves etc.
Adding Wood Textures to our WIP Coffin – Import the wood texture and clip it to your Base Shape, make sure it’s directly above the Base Shape, with nothing below it since the texture is fully opaque.
The Purple layers are our Texture, “Planks” have the texture rotated 90°,
for “Sides” I used the Wood Ribbon brush.
Red layers are the Linework/Nails – Texture is clipped below these layers.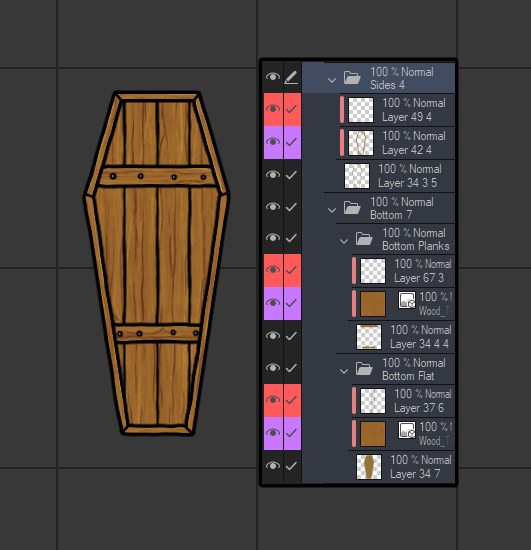
Custom Texturing:
For other materials, the “texture” is usually made on a per-asset basis with shading + some grunge brushed in to break up the large flat areas. Colors are mostly individual based on references and not really standardized either ( and we usually have multiple color variants).
Some objects that are not made with custom texturing
Our Premade Wood Texture is for “Processed” wood – so it’s not used for Stumps, Logs, Branches etc.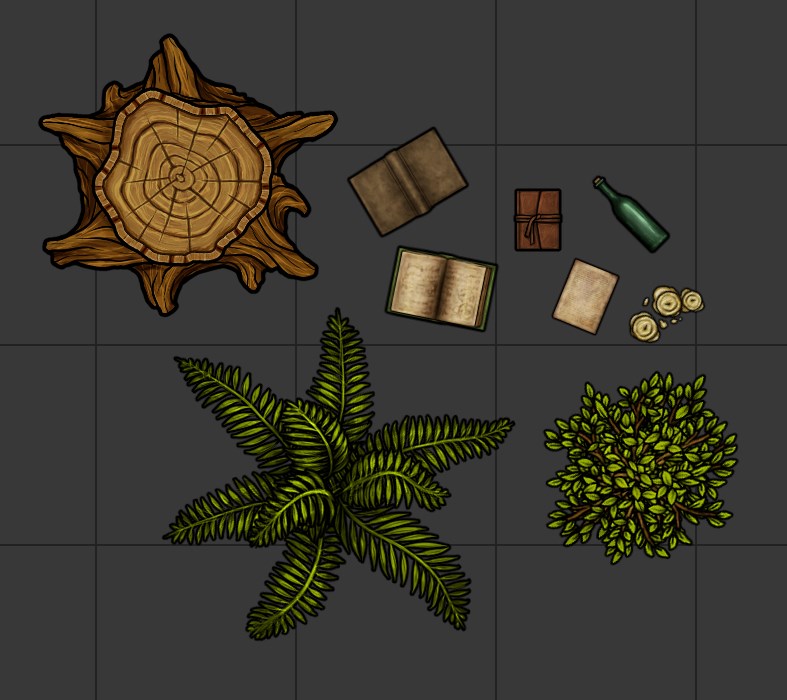
Cloth objects are somewhere in between, we use grunge + half transparent “Canvas” pattern that’s available in CSP by default. The pattern is usually set to “Soft Light” at lower Opacity – The pattern is half transparent, so the color is still done separately. We do have some predetermined cloth colors, but they are still adjusted on a per-asset basis.
Some cloth examples, Altar Runners and Wagon Covers.. Same… but different 😀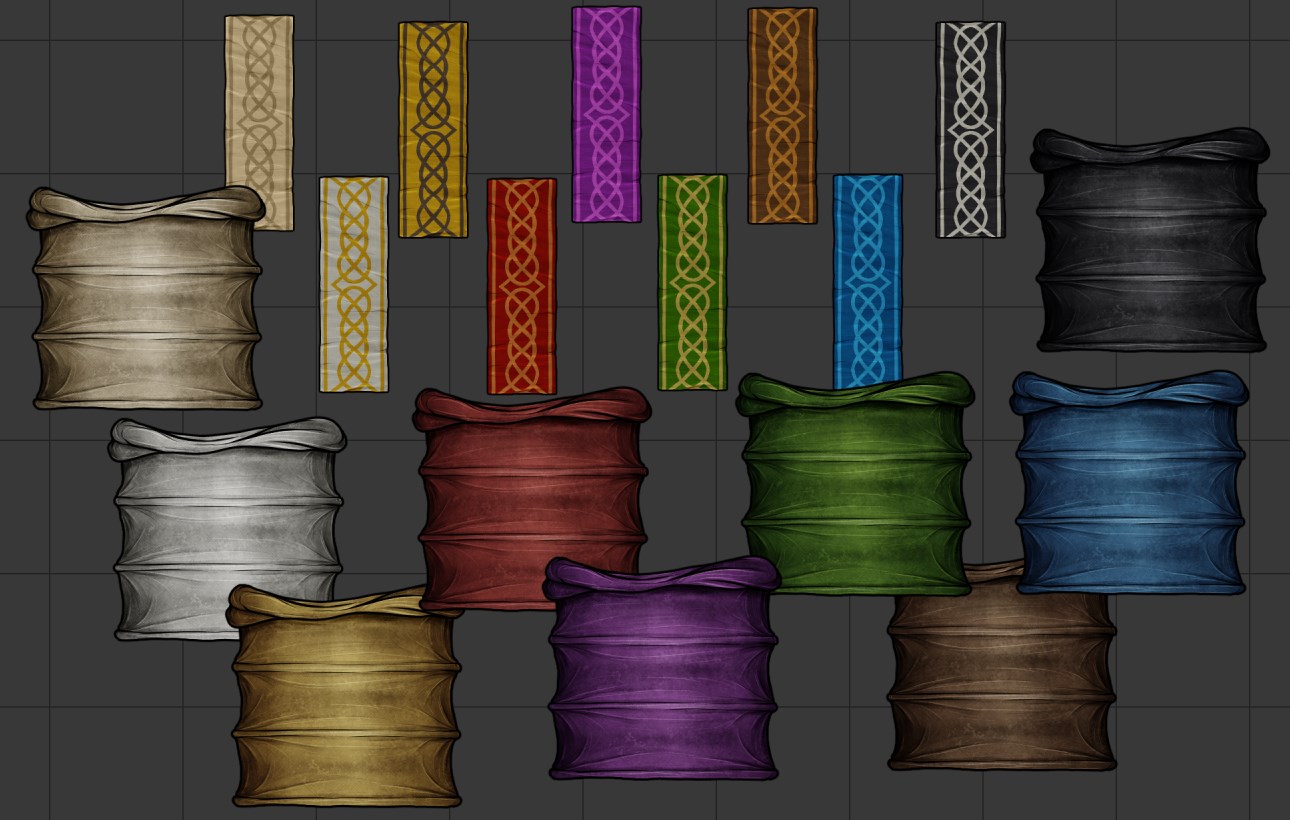
For our showcase assets, the leaf only has a faint grunge brushed in, the rest of the “texture” is gonna be done with shading. Bedroll has both Canvas and Grunge layers + Flat color layers.
You should also add a Flat color layer to the Leaf if you want to recolor it, but it’s not necessary at the moment. I usually do color variants in the export stage.
The Purple layers are our Custom Texture, Red layers are Linework.
Green are our Cloth Flat Colors & 2 Correction Layers – Tone Curve and Hue/Saturation/Luminosity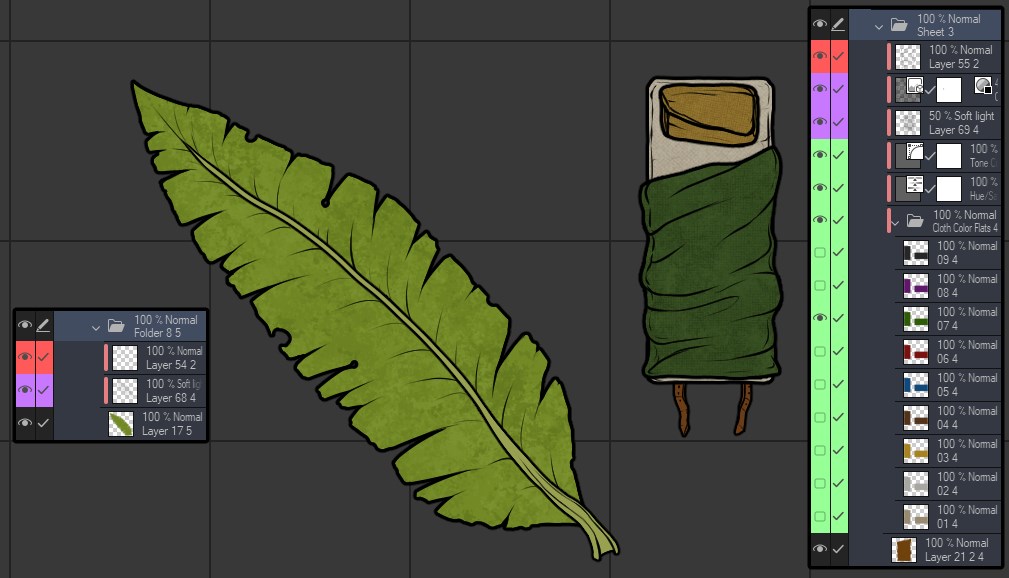
Step 5 – Shading & Highlights
I’ve made a couple of color adjustments to the Backpack and the Bedroll Mat before moving on to shading. I’ve also noticed the Coffin was missing something, so I added “pillars” to the inner edge.
Shading:
I usually Shade in 2-3 Steps, depending on the asset. All shading is done with “Best Color” Brush and with Black Color on a “Soft Light” layer that’s clipped Below linework, and Above texture.
The “Best Color” Brush is pressure sensitive and acts as a Blender at low pressure, and also as an Eraser when you switch to “Transparent Color”.
This means you can do the whole process with one brush; Blocking in rough shadows with high pressure, blending the edges with low pressure, changing the brush size as needed, and swapping between Color and Transparency if you need an eraser to clean up some parts.
If you really need some detailed thin lines, you can also use “G-Pen”.
“Soft Light” layer at 100% wont let you go to pure blacks, it’ll only go to a certain level of darkness.
For deeper shadows, use multiple “Soft Light” layers on top of each other. I use the First layer for broad shading.
If you have part of an object that needs to be “set deeper” than the rest, clip a Normal Layer at low opacity painted with black color to that section.
Before/ After – Adding First layer of Shading
Bottom of the Coffin has a 13% Black Normal layer clipped to it to set it a bit deeper than the sides.
After the first layer of shading is done, I make another Soft Light layer and do more detailed, deeper shadows. This is not always necessary. The “Top” of the coffin didn’t really require a second layer, but the Leaf A changes pretty dramatically, as the shading is almost serving as a texture.
On occasion, I add even more than 2 layers of shading, mainly if I want to keep certain elements separate for further editing, but it wasn’t really needed for these assets.
Before/ After – Adding Second layer of Shading
Highlights:
Where there is shadow, there must be light!
I feel like a lot of people forget about Highlights, and that’s honestly like forgetting 50% of the Shading process in my opinion.
Adding highlights to your artwork literally adds another level of depth to your work and brings it to life.
Adding Highlights in our case is a very similar process to Shading.
Use White Color on “Soft Light”, “Opacity” layers, or a combination of both if you have multiple “levels” of highlights – whichever fits the material better.
I use a combination of “Best Color” – for broader highlights and “G-Pen” for more detailed work, like you can see on the edges of Leaves for example.
Detail shot of the Leaf highlights, “Best Color” is a bit too rough for such detailed work,
so I used G-Pen at 2-4px brush size instead
Before/ After – Adding Highlights
Bonus Step – Coffin Variants
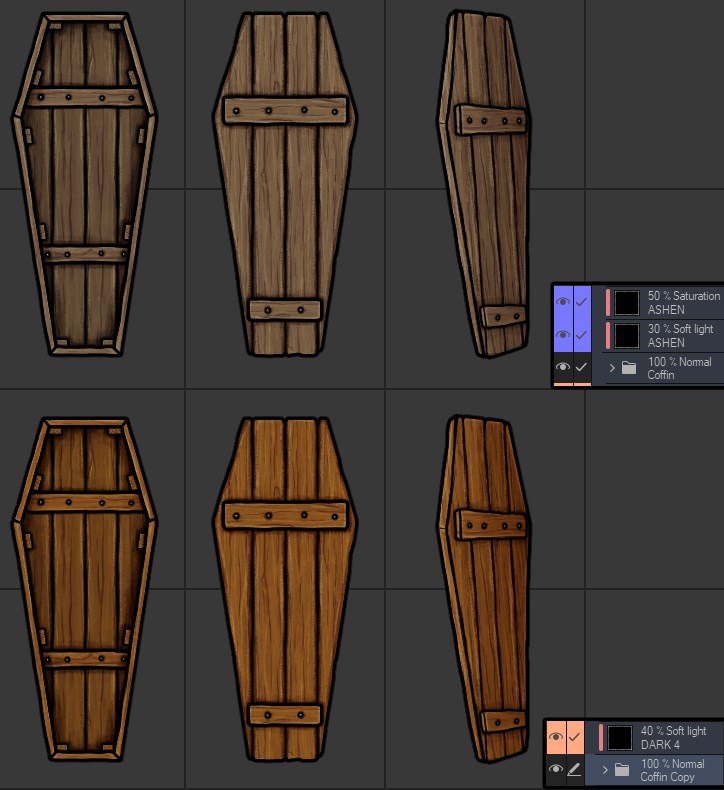
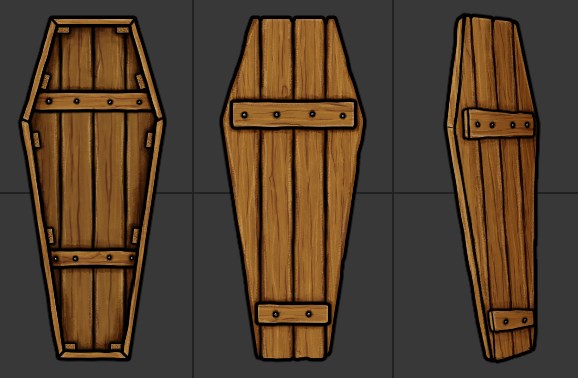
Wood Color Variants
All of our Wooden objects come in 3 color variants, “Light (01)” “Dark (02)” and “Ashen (03)”
The coffin here is an example of a wooden object. However, the coffin is made entirely out of wood, so it is easy to do the color variants through batch processing. For this asset we would only export the “Light” version, “Ashen” and “Dark” variants would be done through batch processing.
You can achieve these recolors by clipping the respective layers to your wooden objects. The layers have specific opacity and blending modes and are filled with Black color.
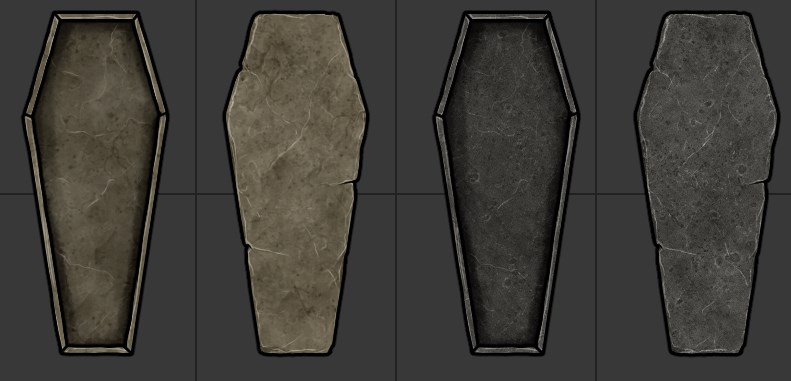
Stone & Metal Variants
Since our whole coffin is pretty modular, making stone and metal variants is as easy as removing the “pillars” and horizontal planks and swapping out the premade textures.
Then you can make some small changes to the base shape, like little bits of stone chipped away on the “Top” part etc. I would probably play around with both of these a little bit more before exporting them, like adding scratches to the metal for example. But you get the idea.

All Drawing Finished!
And that’s all our showcase assets Finished! If you made it this far, Congratulations! 😀
Bedroll & Backpack:

Wooden Coffin:
Stone & Metal Coffins
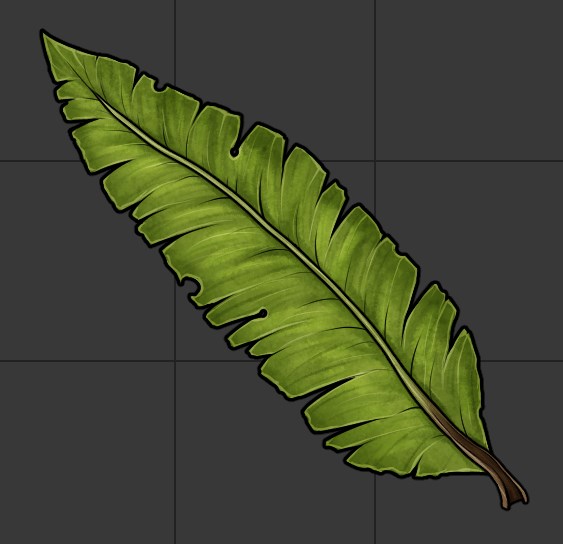
Palm Leaf A
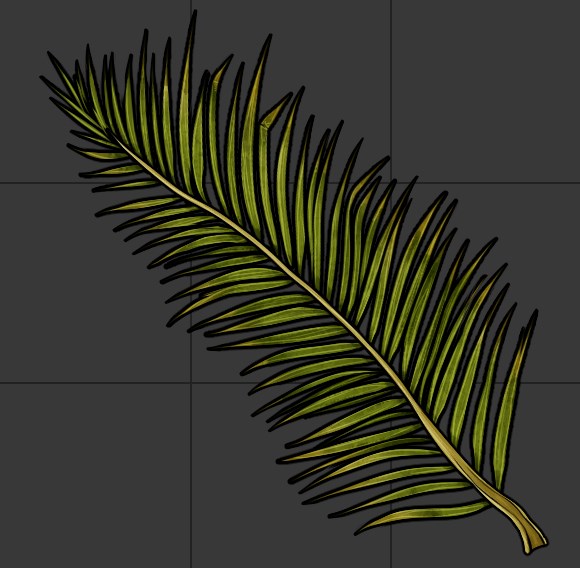
Palm Leaf B
Step 6 – Export
Only thing left to do now is to Export our assets!
All of our assets are exported in “Grid Squares” – It’s required or beneficial for some softwares where our assets are used. It also helps with consistency and scaling.
If the asset is 400×200 you know the size/scale of it is 2×1 inches.
Minimum export size is 1×1 square – 200x200px
There are multiple ways of Exporting your assets, You could make a selection and crop the canvas you are currently using, which can be a bit resource heavy if you have a lot of stuff in your file, then hide the background and save as png.
Another option is to just Manually copy and paste each object folder to a separate new canvas of correct size, recenter it, and save as png.
Or you could use my Export Autoaction, which speeds up this process a little bit.
Make sure you have a background layer named “BG” in your file that covers the whole canvas.
Select all the layers/folders associated with the asset you want to export.
Make your selection ( in Full Grid Squares ).
Click the “Export” Autoaction.
The autoaction will make a new canvas based on your selection, and copy over all your selected layers. If your asset is finished, you can just press “Ctrl+S” and save as png.
After that, since it brings over all your layers, you can also export all the variants!
The original file remains intact, as the autoaction creates a new canvas.
Export Autoaction … in action…
Coffin Folder and Wood Recolor layers selected > Making 1×2 Selection around the Coffin >
Press “Export” Autoaction > Ctrl+S to save as PNG
And we are done!